跨平台原生模組(C++)
用 C++ 撰寫模組是在 Android 和 iOS 之間共享平台不可知程式碼的最佳方式。透過純 C++ 模組,您可以只撰寫一次邏輯,並立即從所有平台重複使用,而無需撰寫平台特定的程式碼。
在本指南中,我們將逐步介紹如何建立純 C++ Turbo 原生模組
- 建立 JS 規格
- 設定 Codegen 以產生骨架程式碼
- 實作原生邏輯
- 在 Android 和 iOS 應用程式中註冊模組
- 在 JS 中測試您的變更
本指南的其餘部分假設您已執行以下命令建立應用程式
npx @react-native-community/cli@latest init SampleApp --version 0.76.0
1. 建立 JS 規格
純 C++ Turbo 原生模組是 Turbo 原生模組。它們需要一個規格檔案(也稱為 spec 檔案),以便 Codegen 可以為我們建立骨架程式碼。規格檔案也是我們在 JS 中存取 Turbo 原生模組的方式。
規格檔案需要以型別化的 JS 方言撰寫。React Native 目前支援 Flow 或 TypeScript。
- 在應用程式的根資料夾內,建立一個名為
specs的新資料夾。 - 建立一個名為
NativeSampleModule.ts的新檔案,並包含以下程式碼
所有原生 Turbo 模組規格檔案都必須有 Native 前綴,否則 Codegen 將會忽略它們。
- TypeScript
- Flow
// @flow
import type {TurboModule} from 'react-native'
import { TurboModuleRegistry } from "react-native";

export interface Spec extends TurboModule {
  +reverseString: (input: string) => string;
}

export default (TurboModuleRegistry.getEnforcing<Spec>(
  "NativeSampleModule"
): Spec);
import {TurboModule, TurboModuleRegistry} from 'react-native';

export interface Spec extends TurboModule {
  readonly reverseString: (input: string) => string;
}

export default TurboModuleRegistry.getEnforcing<Spec>(
  'NativeSampleModule',
);
2. 設定 Codegen
下一步是在您的 package.json 中設定 Codegen。更新檔案以包含
     "start": "react-native start",
     "test": "jest"
   },
   "codegenConfig": {
     "name": "AppSpecs",
     "type": "modules",
     "jsSrcsDir": "specs",
     "android": {
       "javaPackageName": "com.sampleapp.specs"
     }
   },
   "dependencies": {
此設定告知 Codegen 在 specs 資料夾中尋找規格檔案。它也指示 Codegen 僅為 modules 產生程式碼,並將產生的程式碼命名空間為 AppSpecs。
3. 撰寫原生程式碼
撰寫 C++ Turbo 原生模組可讓您在 Android 和 iOS 之間共享程式碼。因此,我們將撰寫一次程式碼,並研究我們需要對平台套用哪些變更,以便可以選取 C++ 程式碼。
-
在與
android和ios資料夾相同的層級建立一個名為shared的資料夾。 -
在
shared資料夾內,建立一個名為NativeSampleModule.h的新檔案。shared/NativeSampleModule.h#pragma once
#include <AppSpecsJSI.h>
#include <memory>
#include <string>
namespace facebook::react {
class NativeSampleModule : public NativeSampleModuleCxxSpec<NativeSampleModule> {
public:
NativeSampleModule(std::shared_ptr<CallInvoker> jsInvoker);
std::string reverseString(jsi::Runtime& rt, std::string input);
};
} // namespace facebook::react -
在
shared資料夾內,建立一個名為NativeSampleModule.cpp的新檔案。shared/NativeSampleModule.cpp#include "NativeSampleModule.h"
namespace facebook::react {
NativeSampleModule::NativeSampleModule(std::shared_ptr<CallInvoker> jsInvoker)
: NativeSampleModuleCxxSpec(std::move(jsInvoker)) {}
std::string NativeSampleModule::reverseString(jsi::Runtime& rt, std::string input) {
return std::string(input.rbegin(), input.rend());
}
} // namespace facebook::react
讓我們看一下我們建立的兩個檔案
NativeSampleModule.h檔案是純 C++ TurboModule 的標頭檔。include陳述式確保我們包含由 Codegen 建立的規格,其中包含我們需要實作的介面和基底類別。- 該模組位於
facebook::react命名空間中,以便存取位於該命名空間中的所有類型。 - 類別
NativeSampleModule是實際的 Turbo 原生模組類別,它擴展了NativeSampleModuleCxxSpec類別,其中包含一些膠合程式碼和樣板程式碼,以使此類別表現為 Turbo 原生模組。 - 最後,我們有建構函式,它接受指向
CallInvoker的指標,以便在需要時與 JS 通訊,以及我們必須實作的函式原型。
NativeSampleModule.cpp 檔案是我們的 Turbo 原生模組的實際實作,並實作了建構函式和我們在規格中宣告的方法。
4. 在平台中註冊模組
接下來的步驟將讓我們在平台中註冊模組。這是將原生程式碼公開給 JS 的步驟,以便 React Native 應用程式最終可以從 JS 層呼叫原生方法。
這是我們唯一需要撰寫一些平台特定程式碼的時候。
Android
為了確保 Android 應用程式可以有效地建置 C++ Turbo 原生模組,我們需要
- 建立
CMakeLists.txt以存取我們的 C++ 程式碼。 - 修改
build.gradle以指向新建立的CMakeLists.txt檔案。 - 在我們的 Android 應用程式中建立一個
OnLoad.cpp檔案,以註冊新的 Turbo 原生模組。
1. 建立 CMakeLists.txt 檔案
Android 使用 CMake 進行建置。CMake 需要存取我們在共享資料夾中定義的檔案才能建置它們。
- 建立一個新資料夾
SampleApp/android/app/src/main/jni。jni資料夾是 Android 的 C++ 端所在的位置。 - 建立一個
CMakeLists.txt檔案並新增此上下文
cmake_minimum_required(VERSION 3.13)

# Define the library name here.
project(appmodules)

# This file includes all the necessary to let you build your React Native application
include(${REACT_ANDROID_DIR}/cmake-utils/ReactNative-application.cmake)

# Define where the additional source code lives. We need to crawl back the jni, main, src, app, android folders
target_sources(${CMAKE_PROJECT_NAME} PRIVATE ../../../../../shared/NativeSampleModule.cpp)

# Define where CMake can find the additional header files. We need to crawl back the jni, main, src, app, android folders
target_include_directories(${CMAKE_PROJECT_NAME} PUBLIC ../../../../../shared)
CMake 檔案執行以下操作
- 定義
appmodules程式庫,其中將包含所有應用程式 C++ 程式碼。 - 載入基本 React Native 的 CMake 檔案。
- 新增我們需要使用
target_sources指令建置的模組 C++ 原始碼。預設情況下,React Native 將已使用預設來源填入appmodules程式庫,在這裡我們包含我們的自訂來源。您可以看到我們需要從jni資料夾爬回到我們的 C++ Turbo 模組所在的shared資料夾。 - 指定 CMake 可以找到模組標頭檔的位置。同樣在這種情況下,我們需要從
jni資料夾爬回去。
2. 修改 build.gradle 以包含自訂 C++ 程式碼
Gradle 是協調 Android 建置的工具。我們需要告訴它在哪裡可以找到 CMake 檔案來建置 Turbo 原生模組。
- 開啟
SampleApp/android/app/build.gradle檔案。 - 將以下區塊新增到 Gradle 檔案中,在現有的
android區塊內
    buildTypes {
        debug {
            signingConfig signingConfigs.debug
        }
        release {
            // Caution! In production, you need to generate your own keystore file.
            // see https://reactnative.dev.org.tw/docs/signed-apk-android.
            signingConfig signingConfigs.debug
            minifyEnabled enableProguardInReleaseBuilds
            proguardFiles getDefaultProguardFile("proguard-android.txt"), "proguard-rules.pro"
        }
    }

+   externalNativeBuild {
+       cmake {
+           path "src/main/jni/CMakeLists.txt"
+       }
+   }
}
此區塊告知 Gradle 檔案在哪裡尋找 CMake 檔案。路徑是相對於 build.gradle 檔案所在的資料夾,因此我們需要新增到 jni 資料夾中 CMakeLists.txt 檔案的路徑。
3. 註冊新的 Turbo 原生模組
最後一步是在執行階段註冊新的 C++ Turbo 原生模組,以便當 JS 需要 C++ Turbo 原生模組時,應用程式知道在哪裡可以找到它並返回它。
- 從資料夾
SampleApp/android/app/src/main/jni,執行以下命令
curl -O https://raw.githubusercontent.com/facebook/react-native/v0.76.0/packages/react-native/ReactAndroid/cmake-utils/default-app-setup/OnLoad.cpp
- 然後,如下修改此檔案
#include <DefaultComponentsRegistry.h>
#include <DefaultTurboModuleManagerDelegate.h>
#include <autolinking.h>
#include <fbjni/fbjni.h>
#include <react/renderer/componentregistry/ComponentDescriptorProviderRegistry.h>
#include <rncore.h>

+ // Include the NativeSampleModule header
+ #include <NativeSampleModule.h>

//...

std::shared_ptr<TurboModule> cxxModuleProvider(
    const std::string& name,
    const std::shared_ptr<CallInvoker>& jsInvoker) {
  // Here you can provide your CXX Turbo Modules coming from
  // either your application or from external libraries. The approach to follow
  // is similar to the following (for a module called `NativeCxxModuleExample`):
  //
  // if (name == NativeCxxModuleExample::kModuleName) {
  //   return std::make_shared<NativeCxxModuleExample>(jsInvoker);
  // }

+  // This code register the module so that when the JS side asks for it, the app can return it
+  if (name == NativeSampleModule::kModuleName) {
+    return std::make_shared<NativeSampleModule>(jsInvoker);
+  }

  // And we fallback to the CXX module providers autolinked
  return autolinking_cxxModuleProvider(name, jsInvoker);
}

// leave the rest of the file
這些步驟從 React Native 下載原始 OnLoad.cpp 檔案,以便我們可以安全地覆寫它,以在應用程式中載入 C++ Turbo 原生模組。
下載檔案後,我們可以透過以下方式修改它
- 包含指向我們模組的標頭檔
- 註冊 Turbo 原生模組,以便當 JS 需要它時,應用程式可以返回它。
現在,您可以從專案根目錄執行 yarn android,以查看您的應用程式是否成功建置。
iOS
為了確保 iOS 應用程式可以有效地建置 C++ Turbo 原生模組,我們需要
- 安裝 Pods 並執行 Codegen。
- 將
shared資料夾新增到我們的 iOS 專案。 - 在應用程式中註冊 C++ Turbo 原生模組。
1. 安裝 Pods 並執行 Codegen。
我們需要執行的第一步是每次我們必須準備 iOS 應用程式時執行的慣用步驟。CocoaPods 是我們用來設定和安裝 React Native 依賴項的工具,作為該過程的一部分,它也會為我們執行 Codegen。
cd ios
bundle install
bundle exec pod install
2. 將 shared 資料夾新增到 iOS 專案
此步驟將 shared 資料夾新增到專案,使其對 Xcode 可見。
- 開啟 CocoPods 產生的 Xcode Workspace。
cd ios
open SampleApp.xcworkspace
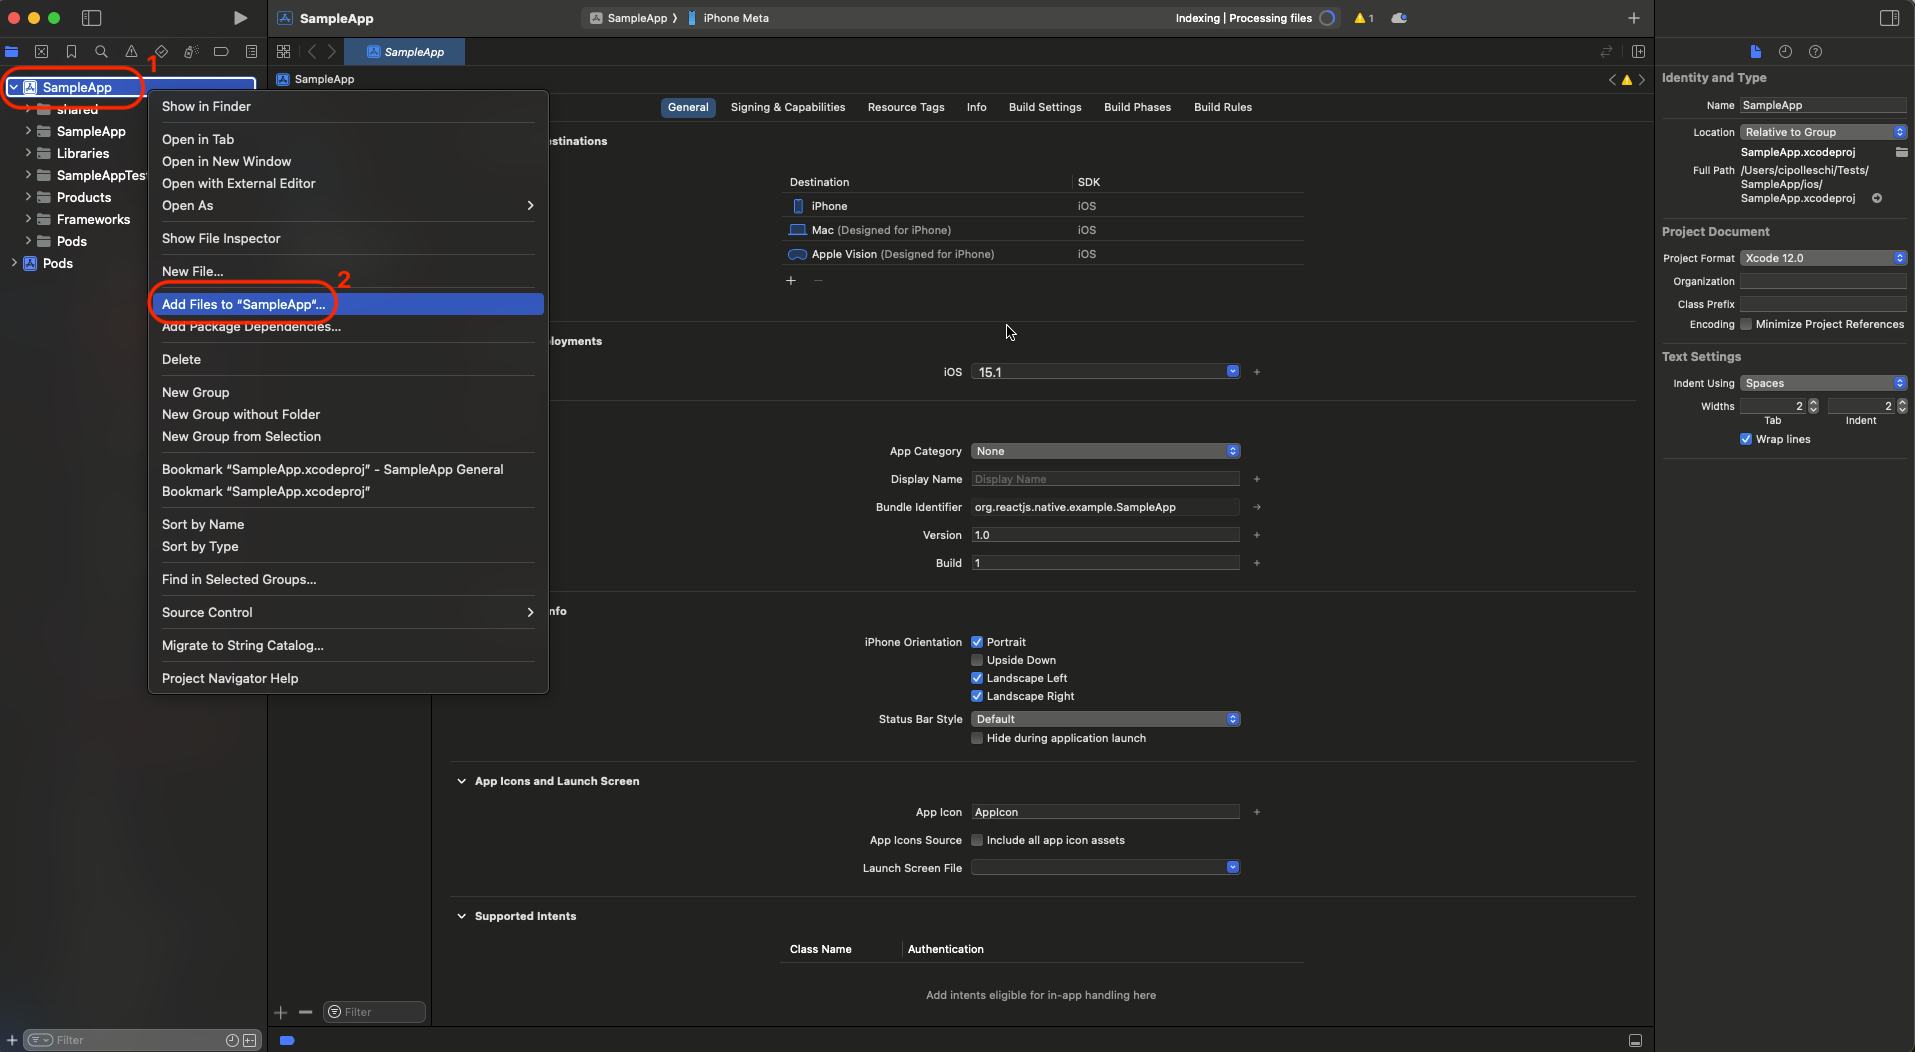
- 按一下左側的
SampleApp專案,然後選取Add files to "Sample App"...。
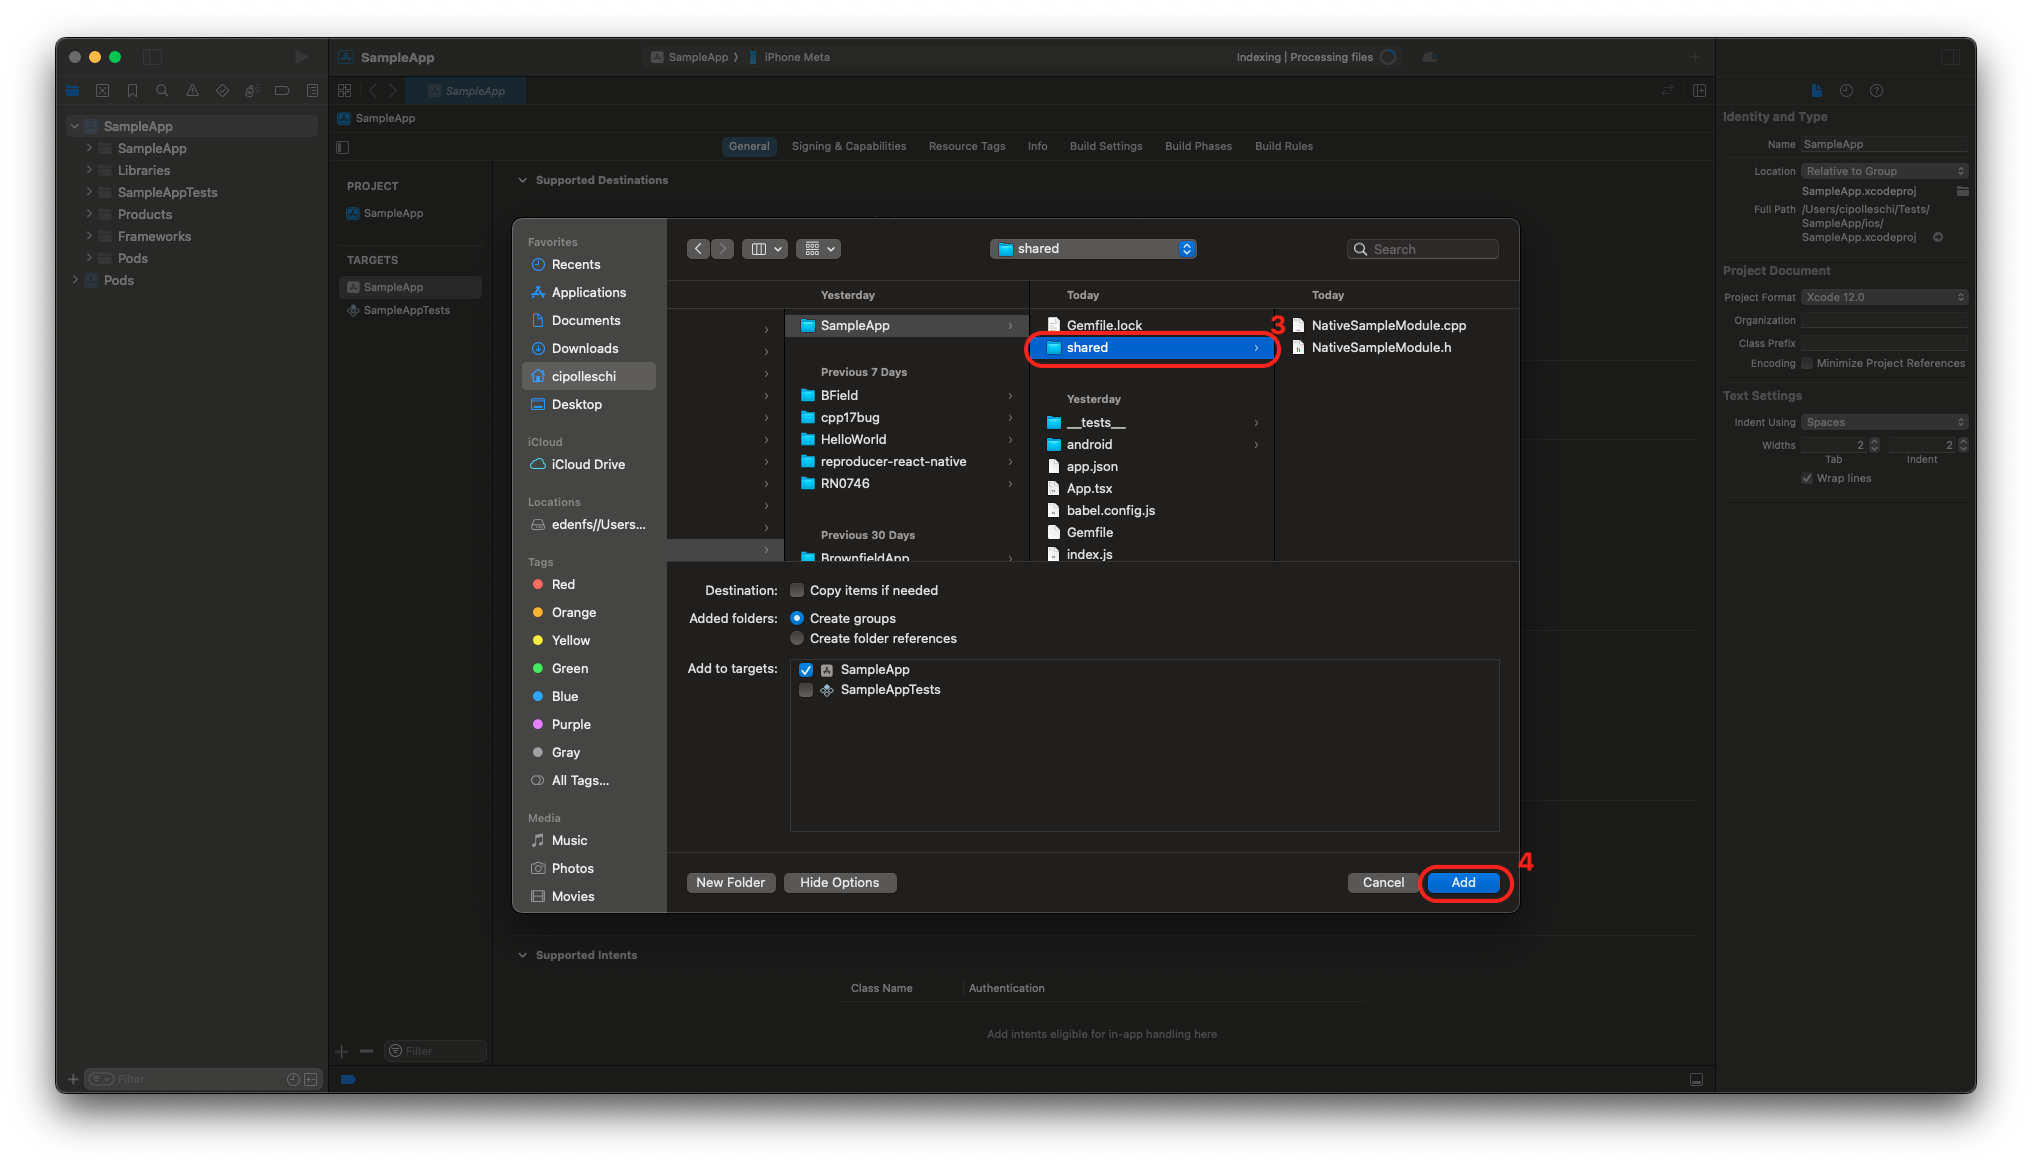
- 選取
shared資料夾,然後按一下Add。
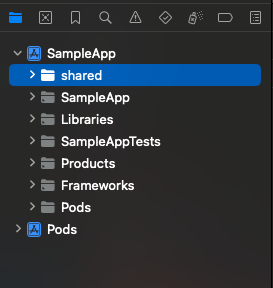
如果您一切都做對了,則左側的專案應如下所示
3. 在您的應用程式中註冊 Cxx Turbo 原生模組
如果您的應用程式有一些以 C++ 撰寫的本機模組,您將無法使用我們在 React Native 0.77 中提供的 Swift 中的 AppDelegate。
如果您的應用程式屬於此類別,請略過將 AppDelegate 遷移到 Swift 的步驟,並繼續為您的應用程式的 AppDelegate 使用 Objective-C++。
React Native 核心主要使用 C++ 開發,以鼓勵 iOS 和 Android 以及其他平台之間的程式碼共享。Swift 和 C++ 之間的互通性尚未成熟且不穩定。我們正在研究填補此差距的方法,並讓您也能遷移到 Swift。
透過最後一步,我們將告訴 iOS 應用程式在哪裡尋找純 C++ Turbo 原生模組。
在 Xcode 中,開啟 AppDelegate.mm 檔案並如下修改它
#import <React/RCTBundleURLProvider.h>
+ #import <RCTAppDelegate+Protected.h>
+ #import "NativeSampleModule.h"

// ...
  return [[NSBundle mainBundle] URLForResource:@"main" withExtension:@"jsbundle"];
#endif
}

+- (std::shared_ptr<facebook::react::TurboModule>)getTurboModule:(const std::string &)name
+                                                      jsInvoker:(std::shared_ptr<facebook::react::CallInvoker>)jsInvoker
+{
+  if (name == "NativeSampleModule") {
+    return std::make_shared<facebook::react::NativeSampleModule>(jsInvoker);
+  }
+
+  return [super getTurboModule:name jsInvoker:jsInvoker];
+}

@end
這些變更正在執行一些操作
- 匯入
RCTAppDelegate+Protected標頭,使其對 AppDelegate 可見,它符合RCTTurboModuleManagerDelegate協定。 - 匯入純 C++ 原生 Turbo 模組介面
NativeSampleModule.h - 覆寫 C++ 模組的
getTurboModule方法,以便當 JS 端要求名為NativeSampleModule的模組時,應用程式知道必須返回哪個模組。
如果您現在從 Xcode 建置您的應用程式,您應該能夠成功建置。
5. 測試您的程式碼
現在是時候從 JS 存取我們的 C++ Turbo 原生模組了。為此,我們必須修改 App.tsx 檔案以匯入 Turbo 原生模組,並在我們的程式碼中呼叫它。
- 開啟
App.tsx檔案。 - 將範本的內容替換為以下程式碼
import React from 'react';
import {
  Button,
  SafeAreaView,
  StyleSheet,
  Text,
  TextInput,
  View,
} from 'react-native';
import SampleTurboModule from './specs/NativeSampleModule';

function App(): React.JSX.Element {
  const [value, setValue] = React.useState('');
  const [reversedValue, setReversedValue] = React.useState('');

  const onPress = () => {
    const revString = SampleTurboModule.reverseString(value);
    setReversedValue(revString);
  };

  return (
    <SafeAreaView style={styles.container}>
      <View>
        <Text style={styles.title}>
          Welcome to C++ Turbo Native Module Example
        </Text>
        <Text>Write down here he text you want to revert</Text>
        <TextInput
          style={styles.textInput}
          placeholder="Write your text here"
          onChangeText={setValue}
          value={value}
        />
        <Button title="Reverse" onPress={onPress} />
        <Text>Reversed text: {reversedValue}</Text>
      </View>
    </SafeAreaView>
  );
}

const styles = StyleSheet.create({
  container: {
    flex: 1,
    justifyContent: 'center',
    alignItems: 'center',
  },
  title: {
    fontSize: 18,
    marginBottom: 20,
  },
  textInput: {
    borderColor: 'black',
    borderWidth: 1,
    borderRadius: 5,
    padding: 10,
    marginTop: 10,
  },
});

export default App;
此應用程式中有趣的程式碼行是
import SampleTurboModule from './specs/NativeSampleModule';:此行在應用程式中匯入 Turbo 原生模組,const revString = SampleTurboModule.reverseString(value);在onPress回呼中:這是您如何在應用程式中使用 Turbo 原生模組的方式。
為了本範例起見,並使其盡可能簡短,我們直接在我們的應用程式中匯入了規格檔案。在這種情況下,最佳實務是建立一個單獨的檔案來包裝規格,並在您的應用程式中使用該檔案。這可讓您準備規格的輸入,並讓您在 JS 中對它們進行更多控制。
恭喜,您撰寫了您的第一個 C++ Turbo 原生模組!
 |  |