原生組件
如果您想建置新的 React Native 組件,以包裝 Host Component,例如 Android 上獨特的 CheckBox 類型,或 iOS 上的 UIButton,則應使用 Fabric 原生組件。
本指南將向您展示如何建置 Fabric 原生組件,方法是實作一個網頁檢視組件。執行此操作的步驟如下
- 使用 Flow 或 TypeScript 定義 JavaScript 規格。
- 設定依賴性管理系統,以從提供的規格產生程式碼並自動連結。
- 實作原生程式碼。
- 在應用程式中使用組件。
您將需要一個產生的純範本應用程式來使用組件
npx @react-native-community/cli@latest init Demo --install-pods false
建立 WebView 組件
本指南將向您展示如何建立 Web View 組件。我們將使用 Android 的 WebView 組件和 iOS WKWebView 組件來建立組件。
讓我們從建立資料夾結構開始,以存放組件的程式碼
mkdir -p Demo/{specs,android/app/src/main/java/com/webview}
這會提供您以下版面配置,您將在其中工作
Demo
├── android/app/src/main/java/com/webview
└── ios
└── specs
android/app/src/main/java/com/webview資料夾是將包含我們 Android 程式碼的資料夾。ios資料夾是將包含我們 iOS 程式碼的資料夾。specs資料夾是將包含 Codegen 規格檔案的資料夾。
1. 定義 Codegen 規格
您的規格必須在 TypeScript 或 Flow 中定義(如需更多詳細資訊,請參閱 Codegen 文件)。Codegen 使用此規格來產生 C++、Objective-C++ 和 Java,以將您的平台程式碼連接到 React 在其中執行的 JavaScript 執行時。
規格檔案必須命名為 <MODULE_NAME>NativeComponent.{ts|js} 才能與 Codegen 搭配使用。後綴 NativeComponent 不僅是一種慣例,實際上 Codegen 會使用它來偵測規格檔案。
將此規格用於我們的 WebView 組件
- TypeScript
- Flow
import type {HostComponent, ViewProps} from 'react-native';
import type {BubblingEventHandler} from 'react-native/Libraries/Types/CodegenTypes';
import codegenNativeComponent from 'react-native/Libraries/Utilities/codegenNativeComponent';

type WebViewScriptLoadedEvent = {
  result: 'success' | 'error';
};

export interface NativeProps extends ViewProps {
  sourceURL?: string;
  onScriptLoaded?: BubblingEventHandler<WebViewScriptLoadedEvent> | null;
}

export default codegenNativeComponent<NativeProps>(
  'CustomWebView',
) as HostComponent<NativeProps>;
// @flow strict-local

import type {HostComponent, ViewProps} from 'react-native';
import type {BubblingEventHandler} from 'react-native/Libraries/Types/CodegenTypes';
import codegenNativeComponent from 'react-native/Libraries/Utilities/codegenNativeComponent';

type WebViewScriptLoadedEvent = $ReadOnly<{|
  result: "success" | "error",
|}>;

type NativeProps = $ReadOnly<{|
  ...ViewProps,
  sourceURL?: string;
  onScriptLoaded?: BubblingEventHandler<WebViewScriptLoadedEvent>?;
|}>;

export default (codegenNativeComponent<NativeProps>(
  'CustomWebView',
): HostComponent<NativeProps>);
此規格由三個主要部分組成,不包括匯入
WebViewScriptLoadedEvent是事件需要從原生傳遞到 JavaScript 的資料的支援資料類型。NativeProps是我們可以在組件上設定的 props 的定義。codegenNativeComponent語句允許我們為自訂組件程式碼產生程式碼,並定義用於比對原生實作的組件名稱。
與原生模組一樣,您可以在 specs/ 目錄中有多個規格檔案。如需有關您可以使用的類型以及這些類型對應到的平台類型的更多資訊,請參閱附錄。
2. 設定 Codegen 執行
規格由 React Native 的 Codegen 工具使用,為我們產生平台特定的介面和樣板。為此,Codegen 需要知道在哪裡找到我們的規格以及如何處理它。更新您的 package.json 以包含
    "start": "react-native start",
    "test": "jest"
  },
  "codegenConfig": {
    "name": "AppSpec",
    "type": "components",
    "jsSrcsDir": "specs",
    "android": {
      "javaPackageName": "com.webview"
    },
    "ios": {
      "componentProvider": {
        "CustomWebView": "RCTWebView"
      }
    }
  },
  "dependencies": {
完成 Codegen 的所有設定後,我們需要準備我們的原生程式碼以連結到我們產生的程式碼。
請注意,對於 iOS,我們以宣告方式將規格匯出的 JS 組件名稱 (CustomWebView) 與將在本機實作組件的 iOS 類別對應。
2. 建置您的原生程式碼
現在是時候編寫原生平台程式碼,以便在 React 要求呈現檢視時,平台可以建立正確的原生檢視並將其呈現在螢幕上。
您應該同時處理 Android 和 iOS 平台。
本指南向您展示如何建立僅適用於新架構的原生組件。如果您需要同時支援新架構和舊架構,請參閱我們的向後相容性指南。
- Android
- iOS
現在是時候編寫一些 Android 平台程式碼,以便能夠呈現網頁檢視。您需要遵循的步驟是
- 執行 Codegen
- 編寫
ReactWebView的程式碼 - 編寫
ReactWebViewManager的程式碼 - 編寫
ReactWebViewPackage的程式碼 - 在應用程式中註冊
ReactWebViewPackage
1. 透過 Gradle 執行 Codegen
執行此操作一次以產生樣板,您的選擇的 IDE 可以使用。
cd android
./gradlew generateCodegenArtifactsFromSchema
Codegen 將產生您需要實作的 ViewManager 介面以及網頁檢視的 ViewManager 委派。
2. 編寫 ReactWebView
ReactWebView 是包裝 Android 原生檢視的組件,React Native 將在使用我們的自訂組件時呈現該檢視。
在 android/src/main/java/com/webview 資料夾中建立一個 ReactWebView.java 或 ReactWebView.kt 檔案,其中包含以下程式碼
- Java
- Kotlin
package com.webview;

import android.content.Context;
import android.util.AttributeSet;
import android.webkit.WebView;
import android.webkit.WebViewClient;

import com.facebook.react.bridge.Arguments;
import com.facebook.react.bridge.WritableMap;
import com.facebook.react.bridge.ReactContext;
import com.facebook.react.uimanager.UIManagerHelper;
import com.facebook.react.uimanager.events.Event;

public class ReactWebView extends WebView {
  public ReactWebView(Context context) {
    super(context);
    configureComponent();
  }

  public ReactWebView(Context context, AttributeSet attrs) {
    super(context, attrs);
    configureComponent();
  }

  public ReactWebView(Context context, AttributeSet attrs, int defStyleAttr) {
    super(context, attrs, defStyleAttr);
    configureComponent();
  }

  private void configureComponent() {
    this.setLayoutParams(new LayoutParams(LayoutParams.MATCH_PARENT, LayoutParams.MATCH_PARENT));
    this.setWebViewClient(new WebViewClient() {
      @Override
      public void onPageFinished(WebView view, String url) {
        emitOnScriptLoaded(OnScriptLoadedEventResult.success);
      }
    });
  }

  public void emitOnScriptLoaded(OnScriptLoadedEventResult result) {
    ReactContext reactContext = (ReactContext) context;
    int surfaceId = UIManagerHelper.getSurfaceId(reactContext);
    EventDispatcher eventDispatcher = UIManagerHelper.getEventDispatcherForReactTag(reactContext, getId());
    WritableMap payload = Arguments.createMap();
    payload.putString("result", result.name());

    OnScriptLoadedEvent event = new OnScriptLoadedEvent(surfaceId, getId(), payload);
    if (eventDispatcher != null) {
      eventDispatcher.dispatchEvent(event);
    }
  }

  public enum OnScriptLoadedEventResult {
    success,
    error
  }

  private class OnScriptLoadedEvent extends Event<OnScriptLoadedEvent> {
    private final WritableMap payload;

    OnScriptLoadedEvent(int surfaceId, int viewId, WritableMap payload) {
      super(surfaceId, viewId);
      this.payload = payload;
    }

    @Override
    public String getEventName() {
      return "onScriptLoaded";
    }

    @Override
    public WritableMap getEventData() {
      return payload;
    }
  }
}
package com.webview

import android.content.Context
import android.util.AttributeSet
import android.webkit.WebView
import android.webkit.WebViewClient
import com.facebook.react.bridge.Arguments
import com.facebook.react.bridge.WritableMap
import com.facebook.react.bridge.ReactContext
import com.facebook.react.uimanager.UIManagerHelper
import com.facebook.react.uimanager.events.Event

class ReactWebView: WebView {
  constructor(context: Context) : super(context) {
    configureComponent()
  }

  constructor(context: Context, attrs: AttributeSet?) : super(context, attrs) {
    configureComponent()
  }

  constructor(context: Context, attrs: AttributeSet?, defStyleAttr: Int) : super(context, attrs, defStyleAttr) {
    configureComponent()
  }

  private fun configureComponent() {
    this.layoutParams = LayoutParams(LayoutParams.MATCH_PARENT, LayoutParams.MATCH_PARENT)
    this.webViewClient = object : WebViewClient() {
      override fun onPageFinished(view: WebView, url: String) {
        emitOnScriptLoaded(OnScriptLoadedEventResult.success)
      }
    }
  }

  fun emitOnScriptLoaded(result: OnScriptLoadedEventResult) {
    val reactContext = context as ReactContext
    val surfaceId = UIManagerHelper.getSurfaceId(reactContext)
    val eventDispatcher = UIManagerHelper.getEventDispatcherForReactTag(reactContext, id)
    val payload =
        Arguments.createMap().apply {
          putString("result", result.name)
        }
    val event = OnScriptLoadedEvent(surfaceId, id, payload)

    eventDispatcher?.dispatchEvent(event)
  }

  enum class OnScriptLoadedEventResult {
    success,
    error;
  }

  inner class OnScriptLoadedEvent(
      surfaceId: Int,
      viewId: Int,
      private val payload: WritableMap
  ) : Event<OnScriptLoadedEvent>(surfaceId, viewId) {
    override fun getEventName() = "onScriptLoaded"

    override fun getEventData() = payload
  }
}
ReactWebView 擴展了 Android WebView,因此您可以輕鬆重複使用平台已定義的所有屬性。
該類別定義了三個 Android 建構函式,但將其實際實作延遲到私有的 configureComponent 函數。此函數負責初始化所有組件特定的屬性:在本例中,您正在設定 WebView 的佈局,並且正在定義用於自訂 WebView 行為的 WebClient。在此程式碼中,ReactWebView 在頁面完成載入時發出事件,方法是實作 WebClient 的 onPageFinished 方法。
然後,程式碼定義了一個輔助函數來實際發出事件。若要發出事件,您必須
- 取得對
ReactContext的參考; - 擷取您正在呈現的檢視的
surfaceId; - 取得對與檢視關聯的
eventDispatcher的參考; - 使用
WritableMap物件建置事件的酬載; - 建立您需要傳送至 JavaScript 的事件物件;
- 呼叫
eventDispatcher.dispatchEvent以傳送事件。
檔案的最後一部分包含您需要傳送事件的資料類型的定義
OnScriptLoadedEventResult,其中包含OnScriptLoaded事件的可能結果。- 實際的
OnScriptLoadedEvent需要擴展 React Native 的Event類別。
3. 編寫 WebViewManager
WebViewManager 是將 React Native 執行時與原生檢視連接的類別。
當 React 從應用程式接收到呈現特定組件的指令時,React 會使用已註冊的檢視管理器來建立檢視並傳遞所有必要的屬性。
這是 ReactWebViewManager 的程式碼。
- Java
- Kotlin
package com.webview;

import com.facebook.react.bridge.ReactApplicationContext;
import com.facebook.react.module.annotations.ReactModule;
import com.facebook.react.uimanager.SimpleViewManager;
import com.facebook.react.uimanager.ThemedReactContext;
import com.facebook.react.uimanager.ViewManagerDelegate;
import com.facebook.react.uimanager.annotations.ReactProp;
import com.facebook.react.viewmanagers.CustomWebViewManagerInterface;
import com.facebook.react.viewmanagers.CustomWebViewManagerDelegate;

import java.util.HashMap;
import java.util.Map;

@ReactModule(name = ReactWebViewManager.REACT_CLASS)
class ReactWebViewManager extends SimpleViewManager<ReactWebView> implements CustomWebViewManagerInterface<ReactWebView> {
  private final CustomWebViewManagerDelegate<ReactWebView, ReactWebViewManager> delegate =
          new CustomWebViewManagerDelegate<>(this);

  @Override
  public ViewManagerDelegate<ReactWebView> getDelegate() {
    return delegate;
  }

  @Override
  public String getName() {
    return REACT_CLASS;
  }

  @Override
  public ReactWebView createViewInstance(ThemedReactContext context) {
    return new ReactWebView(context);
  }

  @ReactProp(name = "sourceUrl")
  @Override
  public void setSourceURL(ReactWebView view, String sourceURL) {
    if (sourceURL == null) {
      view.emitOnScriptLoaded(ReactWebView.OnScriptLoadedEventResult.error);
      return;
    }
    view.loadUrl(sourceURL, new HashMap<>());
  }

  public static final String REACT_CLASS = "CustomWebView";

  @Override
  public Map<String, Object> getExportedCustomBubblingEventTypeConstants() {
    Map<String, Object> map = new HashMap<>();
    Map<String, Object> bubblingMap = new HashMap<>();
    bubblingMap.put("phasedRegistrationNames", new HashMap<String, String>() {{
      put("bubbled", "onScriptLoaded");
      put("captured", "onScriptLoadedCapture");
    }});
    map.put("onScriptLoaded", bubblingMap);
    return map;
  }
}
package com.webview

import com.facebook.react.bridge.ReactApplicationContext;
import com.facebook.react.module.annotations.ReactModule;
import com.facebook.react.uimanager.SimpleViewManager;
import com.facebook.react.uimanager.ThemedReactContext;
import com.facebook.react.uimanager.ViewManagerDelegate;
import com.facebook.react.uimanager.annotations.ReactProp;
import com.facebook.react.viewmanagers.CustomWebViewManagerInterface;
import com.facebook.react.viewmanagers.CustomWebViewManagerDelegate;

@ReactModule(name = ReactWebViewManager.REACT_CLASS)
class ReactWebViewManager(context: ReactApplicationContext) : SimpleViewManager<ReactWebView>(), CustomWebViewManagerInterface<ReactWebView> {
  private val delegate: CustomWebViewManagerDelegate<ReactWebView, ReactWebViewManager> =
    CustomWebViewManagerDelegate(this)

  override fun getDelegate(): ViewManagerDelegate<ReactWebView> = delegate

  override fun getName(): String = REACT_CLASS

  override fun createViewInstance(context: ThemedReactContext): ReactWebView = ReactWebView(context)

  @ReactProp(name = "sourceUrl")
  override fun setSourceURL(view: ReactWebView, sourceURL: String?) {
    if (sourceURL == null) {
      view.emitOnScriptLoaded(ReactWebView.OnScriptLoadedEventResult.error)
      return;
    }
    view.loadUrl(sourceURL, emptyMap())
  }

  companion object {
    const val REACT_CLASS = "CustomWebView"
  }

  override fun getExportedCustomBubblingEventTypeConstants(): Map<String, Any> =
      mapOf(
          "onScriptLoaded" to
              mapOf(
                  "phasedRegistrationNames" to
                      mapOf(
                          "bubbled" to "onScriptLoaded",
                          "captured" to "onScriptLoadedCapture"
                      )))
}
ReactWebViewManager 擴展了 React 的 SimpleViewManager 類別,並實作了 Codegen 產生的 CustomWebViewManagerInterface。
它保存了 CustomWebViewManagerDelegate 的參考,這是 Codegen 產生的另一個元素。
然後,它覆寫了 getName 函數,該函數必須傳回規格的 codegenNativeComponent 函數呼叫中使用的相同名稱。
createViewInstance 函數負責實例化新的 ReactWebView。
然後,ViewManager 需要定義所有 React 組件 props 如何更新原生檢視。在範例中,您需要決定如何處理 React 將在 WebView 上設定的 sourceURL 屬性。
最後,如果組件可以發出事件,您需要透過覆寫泡泡事件的 getExportedCustomBubblingEventTypeConstants 或直接事件的 getExportedCustomDirectEventTypeConstants 來對應事件名稱。
4. 編寫 ReactWebViewPackage
與原生模組一樣,原生組件也需要實作 ReactPackage 類別。這是一個物件,您可以使用它在 React Native 執行時註冊組件。
這是 ReactWebViewPackage 的程式碼
- Java
- Kotlin
package com.webview;

import com.facebook.react.BaseReactPackage;
import com.facebook.react.bridge.NativeModule;
import com.facebook.react.bridge.ReactApplicationContext;
import com.facebook.react.module.model.ReactModuleInfo;
import com.facebook.react.module.model.ReactModuleInfoProvider;
import com.facebook.react.uimanager.ViewManager;

import java.util.Collections;
import java.util.HashMap;
import java.util.List;
import java.util.Map;

public class ReactWebViewPackage extends BaseReactPackage {
  @Override
  public List<ViewManager<?, ?>> createViewManagers(ReactApplicationContext reactContext) {
    return Collections.singletonList(new ReactWebViewManager(reactContext));
  }

  @Override
  public NativeModule getModule(String s, ReactApplicationContext reactApplicationContext) {
    if (ReactWebViewManager.REACT_CLASS.equals(s)) {
      return new ReactWebViewManager(reactApplicationContext);
    }
    return null;
  }

  @Override
  public ReactModuleInfoProvider getReactModuleInfoProvider() {
    return new ReactModuleInfoProvider() {
      @Override
      public Map<String, ReactModuleInfo> getReactModuleInfos() {
        Map<String, ReactModuleInfo> map = new HashMap<>();
        map.put(ReactWebViewManager.REACT_CLASS, new ReactModuleInfo(
                ReactWebViewManager.REACT_CLASS, // name
                ReactWebViewManager.REACT_CLASS, // className
                false,                           // canOverrideExistingModule
                false,                           // needsEagerInit
                false,                           // isCxxModule
                true                             // isTurboModule
        ));
        return map;
      }
    };
  }
}
package com.webview

import com.facebook.react.BaseReactPackage
import com.facebook.react.bridge.NativeModule
import com.facebook.react.bridge.ReactApplicationContext
import com.facebook.react.module.model.ReactModuleInfo
import com.facebook.react.module.model.ReactModuleInfoProvider
import com.facebook.react.uimanager.ViewManager

class ReactWebViewPackage : BaseReactPackage() {
  override fun createViewManagers(reactContext: ReactApplicationContext): List<ViewManager<*, *>> {
    return listOf(ReactWebViewManager(reactContext))
  }

  override fun getModule(s: String, reactApplicationContext: ReactApplicationContext): NativeModule? {
    when (s) {
      ReactWebViewManager.REACT_CLASS -> ReactWebViewManager(reactApplicationContext)
    }
    return null
  }

  override fun getReactModuleInfoProvider(): ReactModuleInfoProvider = ReactModuleInfoProvider {
    mapOf(ReactWebViewManager.REACT_CLASS to ReactModuleInfo(
      _name = ReactWebViewManager.REACT_CLASS,
      _className = ReactWebViewManager.REACT_CLASS,
      _canOverrideExistingModule = false,
      _needsEagerInit = false,
      isCxxModule = false,
      isTurboModule = true,
    )
    )
  }
}
ReactWebViewPackage 擴展了 BaseReactPackage 並實作了正確註冊我們組件所需的所有方法。
createViewManagers方法是建立管理自訂檢視的ViewManager的工廠方法。getModule方法會傳回適當的 ViewManager,具體取決於 React Native 需要呈現的檢視。getReactModuleInfoProvider提供在執行時註冊模組時所需的所有資訊,
5. 在應用程式中註冊 ReactWebViewPackage
最後,您需要在應用程式中註冊 ReactWebViewPackage。我們透過修改 MainApplication 檔案來執行此操作,方法是將 ReactWebViewPackage 新增至 getPackages 函數傳回的套件清單。
package com.demo

import android.app.Application
import com.facebook.react.PackageList
import com.facebook.react.ReactApplication
import com.facebook.react.ReactHost
import com.facebook.react.ReactNativeHost
import com.facebook.react.ReactPackage
import com.facebook.react.defaults.DefaultNewArchitectureEntryPoint.load
import com.facebook.react.defaults.DefaultReactHost.getDefaultReactHost
import com.facebook.react.defaults.DefaultReactNativeHost
import com.facebook.react.soloader.OpenSourceMergedSoMapping
import com.facebook.soloader.SoLoader
import com.webview.ReactWebViewPackage

class MainApplication : Application(), ReactApplication {

  override val reactNativeHost: ReactNativeHost =
      object : DefaultReactNativeHost(this) {
        override fun getPackages(): List<ReactPackage> =
            PackageList(this).packages.apply {
              add(ReactWebViewPackage())
            }

        override fun getJSMainModuleName(): String = "index"

        override fun getUseDeveloperSupport(): Boolean = BuildConfig.DEBUG

        override val isNewArchEnabled: Boolean = BuildConfig.IS_NEW_ARCHITECTURE_ENABLED
        override val isHermesEnabled: Boolean = BuildConfig.IS_HERMES_ENABLED
      }

  override val reactHost: ReactHost
    get() = getDefaultReactHost(applicationContext, reactNativeHost)

  override fun onCreate() {
    super.onCreate()
    SoLoader.init(this, OpenSourceMergedSoMapping)
    if (BuildConfig.IS_NEW_ARCHITECTURE_ENABLED) {
      load()
    }
  }
}
現在是時候編寫一些 iOS 平台程式碼,以便能夠呈現網頁檢視。您需要遵循的步驟是
- 執行 Codegen。
- 編寫
RCTWebView的程式碼 - 在應用程式中註冊
RCTWebView
1. 執行 Codegen
您可以手動執行 Codegen,但是使用您將在其中示範組件的應用程式來為您執行此操作更簡單。
cd ios
bundle install
bundle exec pod install
重要的是,您將看到 Codegen 的記錄輸出,我們將在 Xcode 中使用它來建置我們的 WebView 原生組件。
您應謹慎將產生的程式碼提交到您的儲存庫。產生的程式碼特定於 React Native 的每個版本。使用 npm peerDependencies 來限制與 React Native 版本的相容性。
3. 編寫 RCTWebView
我們需要使用 Xcode 準備您的 iOS 專案,方法是完成以下5 個步驟
- 開啟 CocoPods 產生的 Xcode Workspace
cd ios
open Demo.xcworkspace
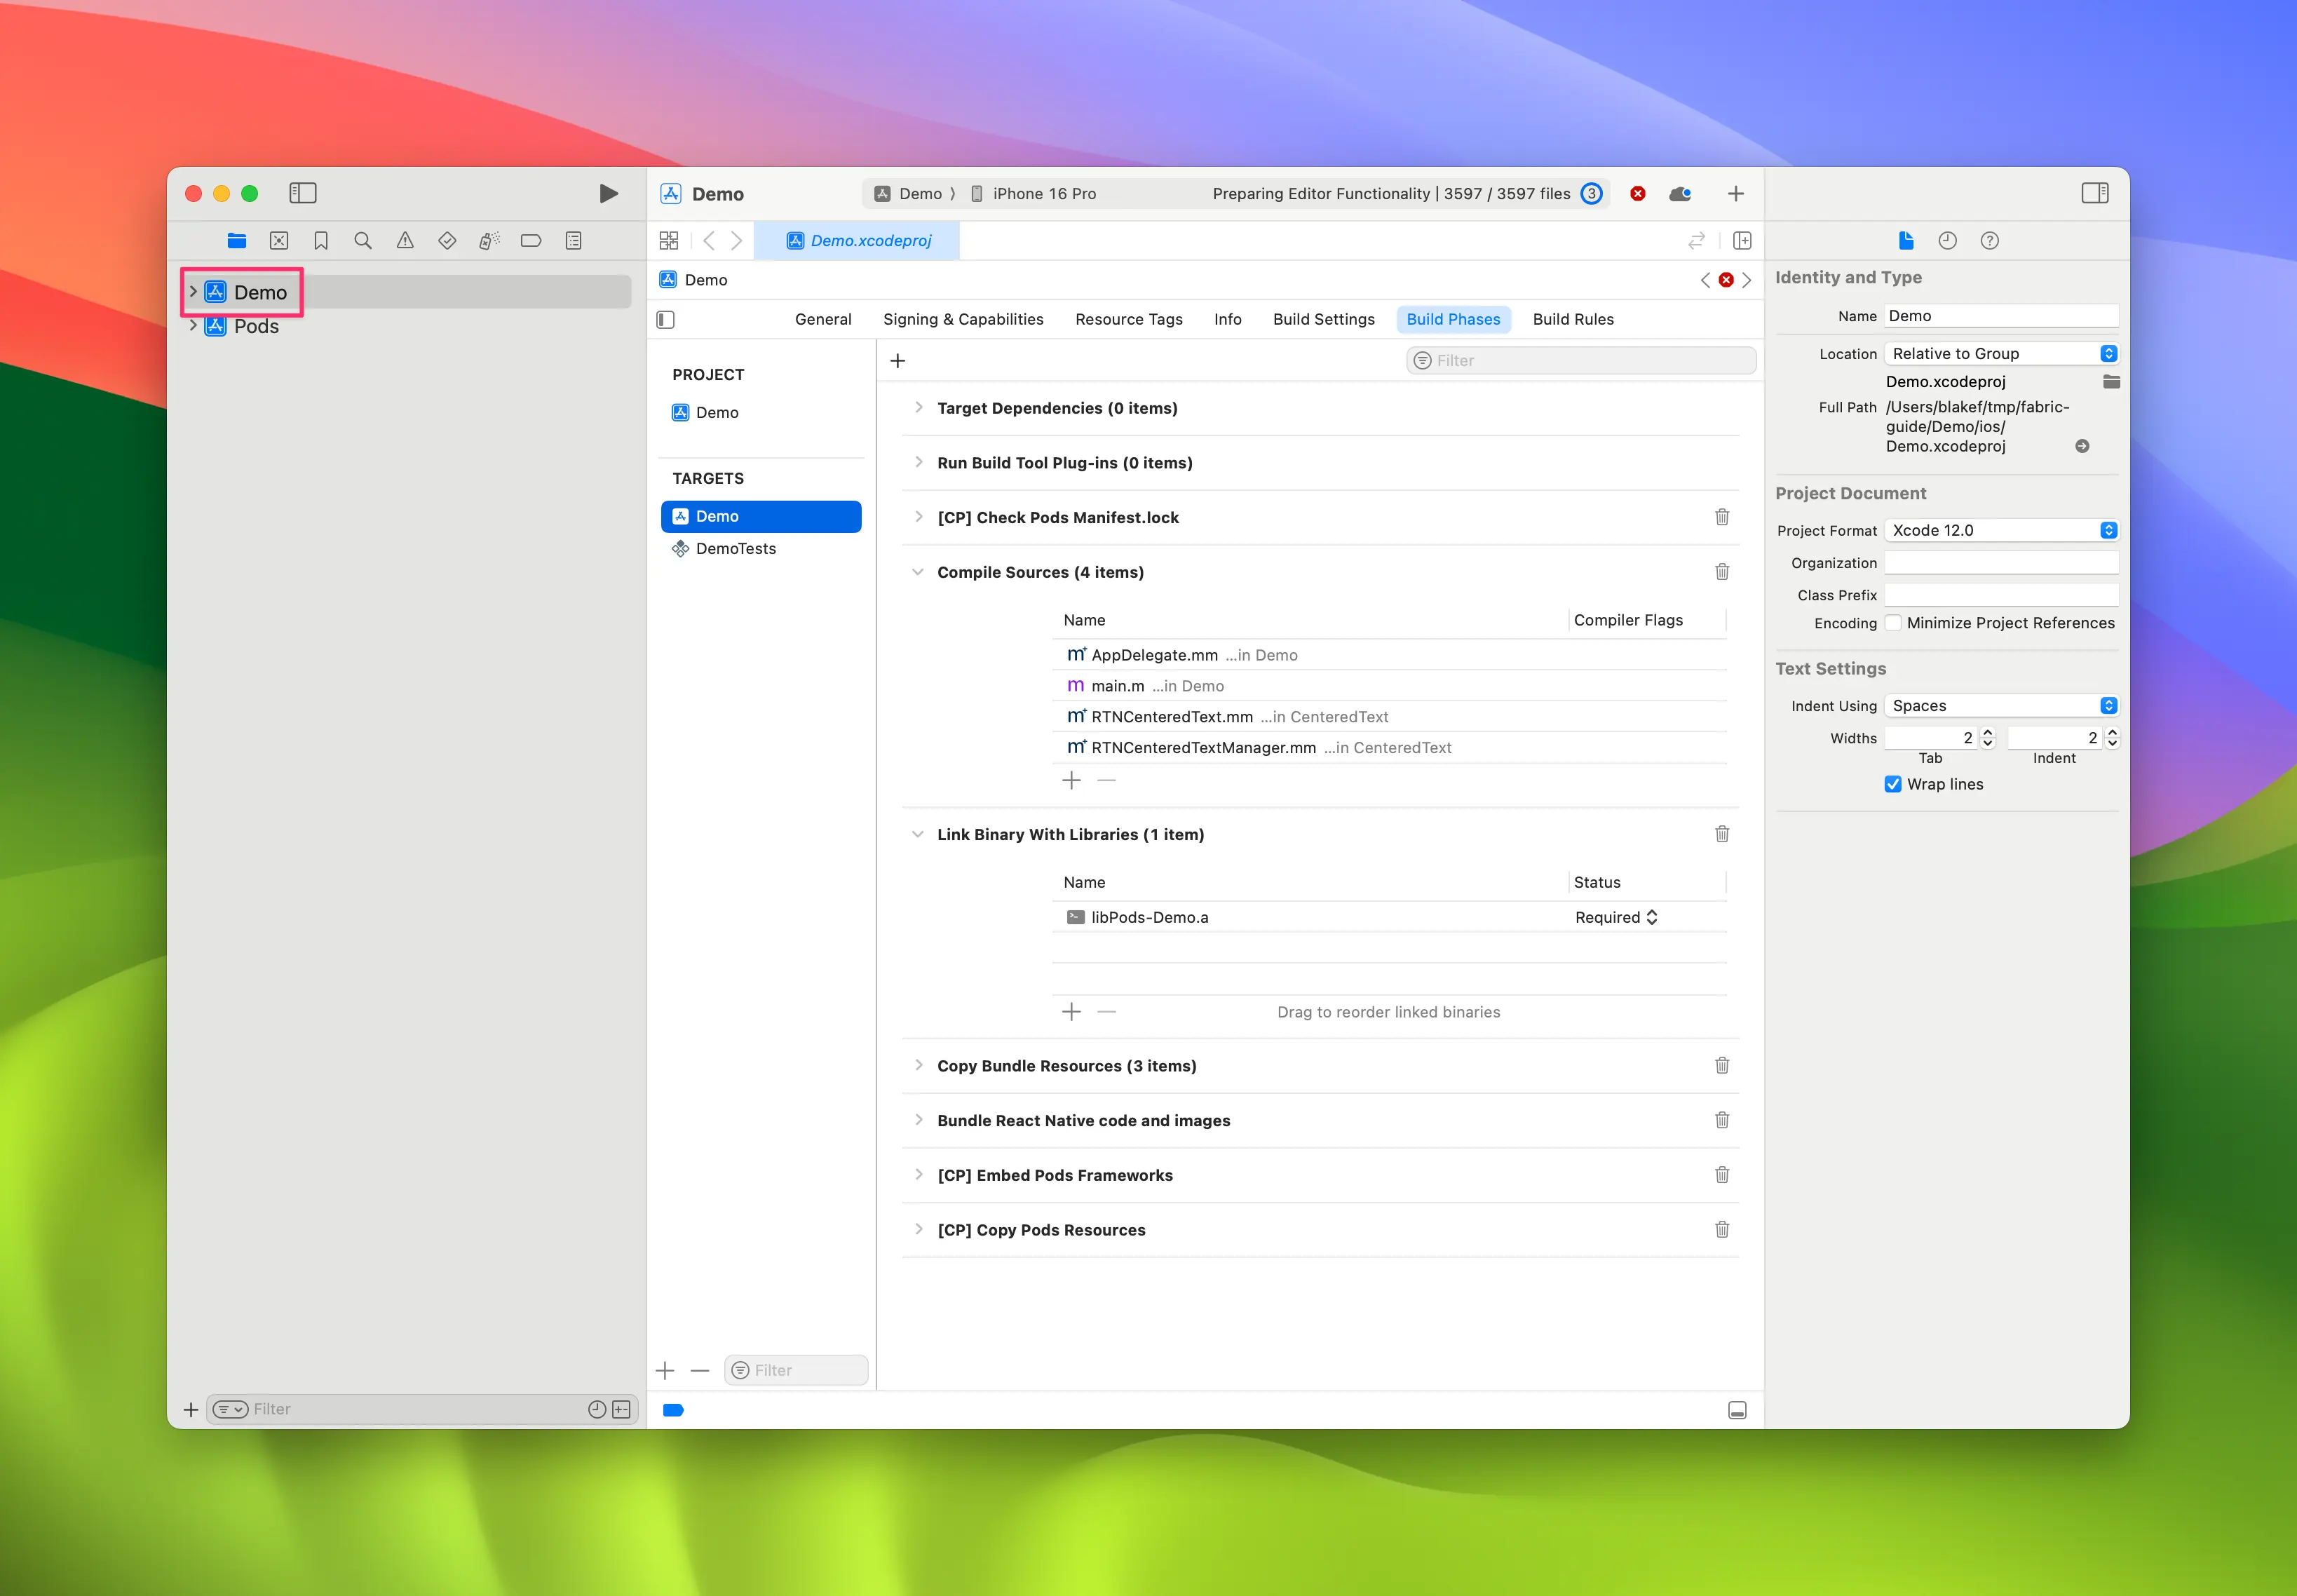
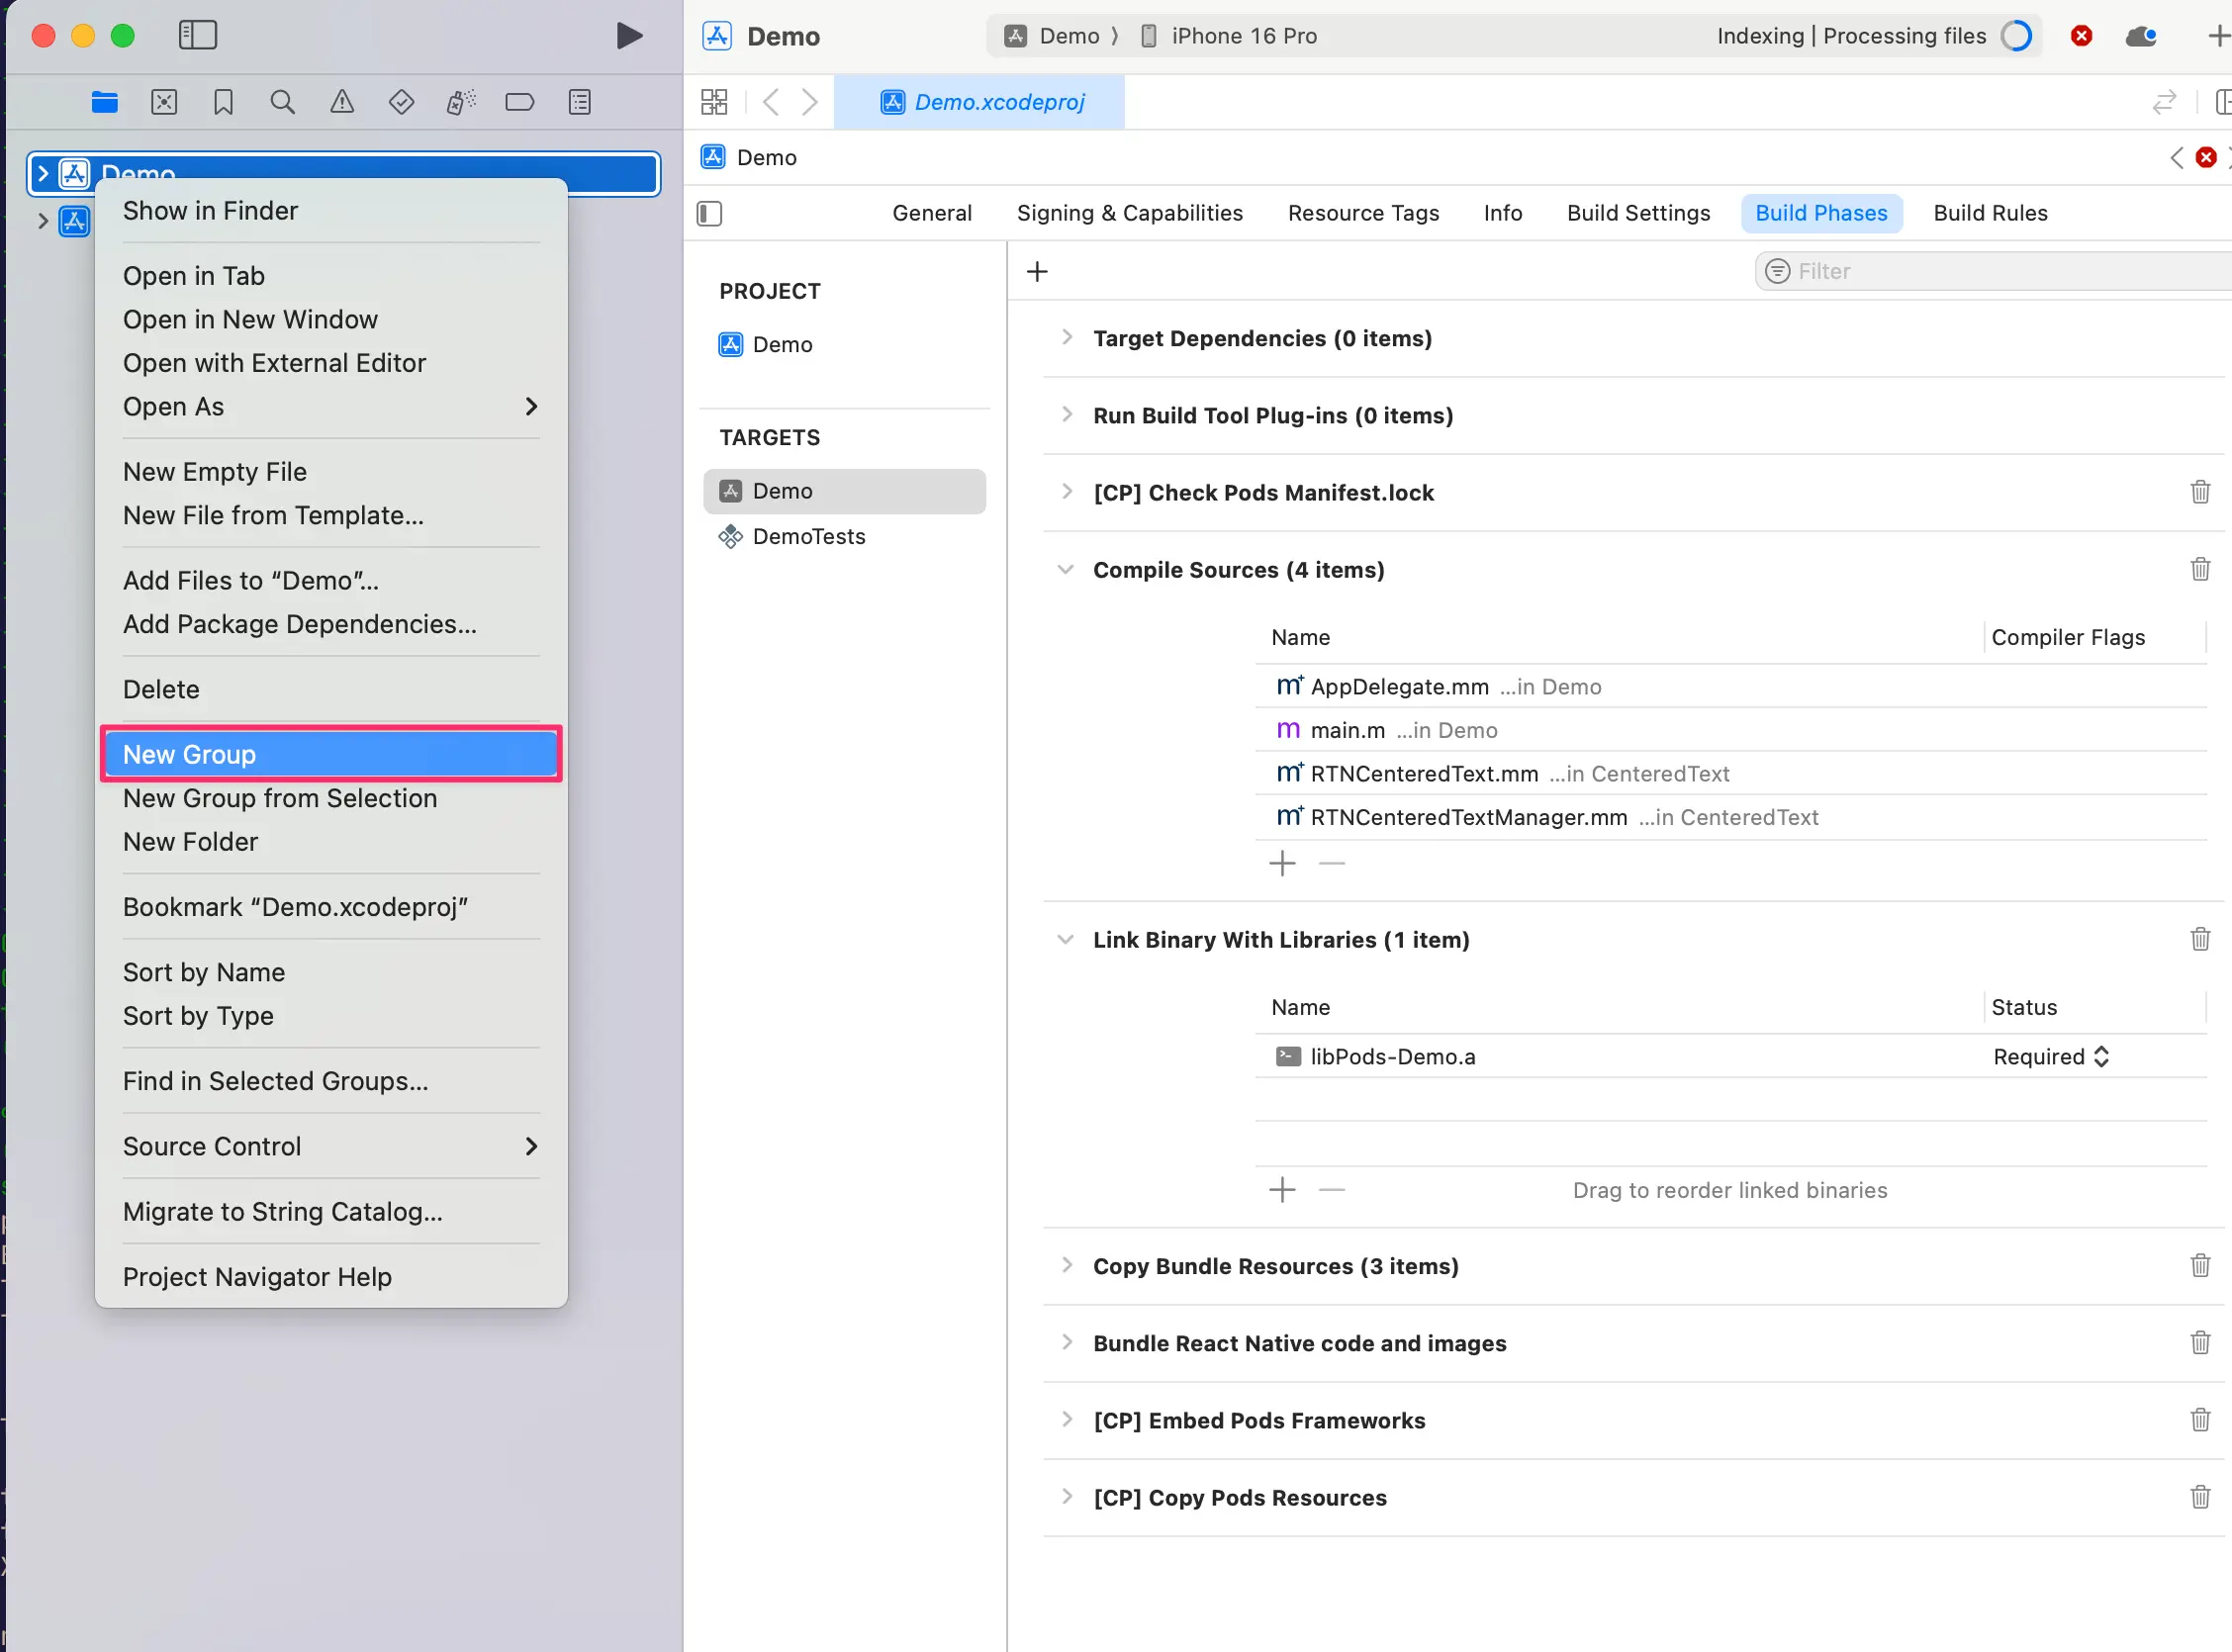
- 在 app 上按一下滑鼠右鍵並選取
New Group,將新群組命名為WebView。
- 在
WebView群組中,建立New→File from Template。
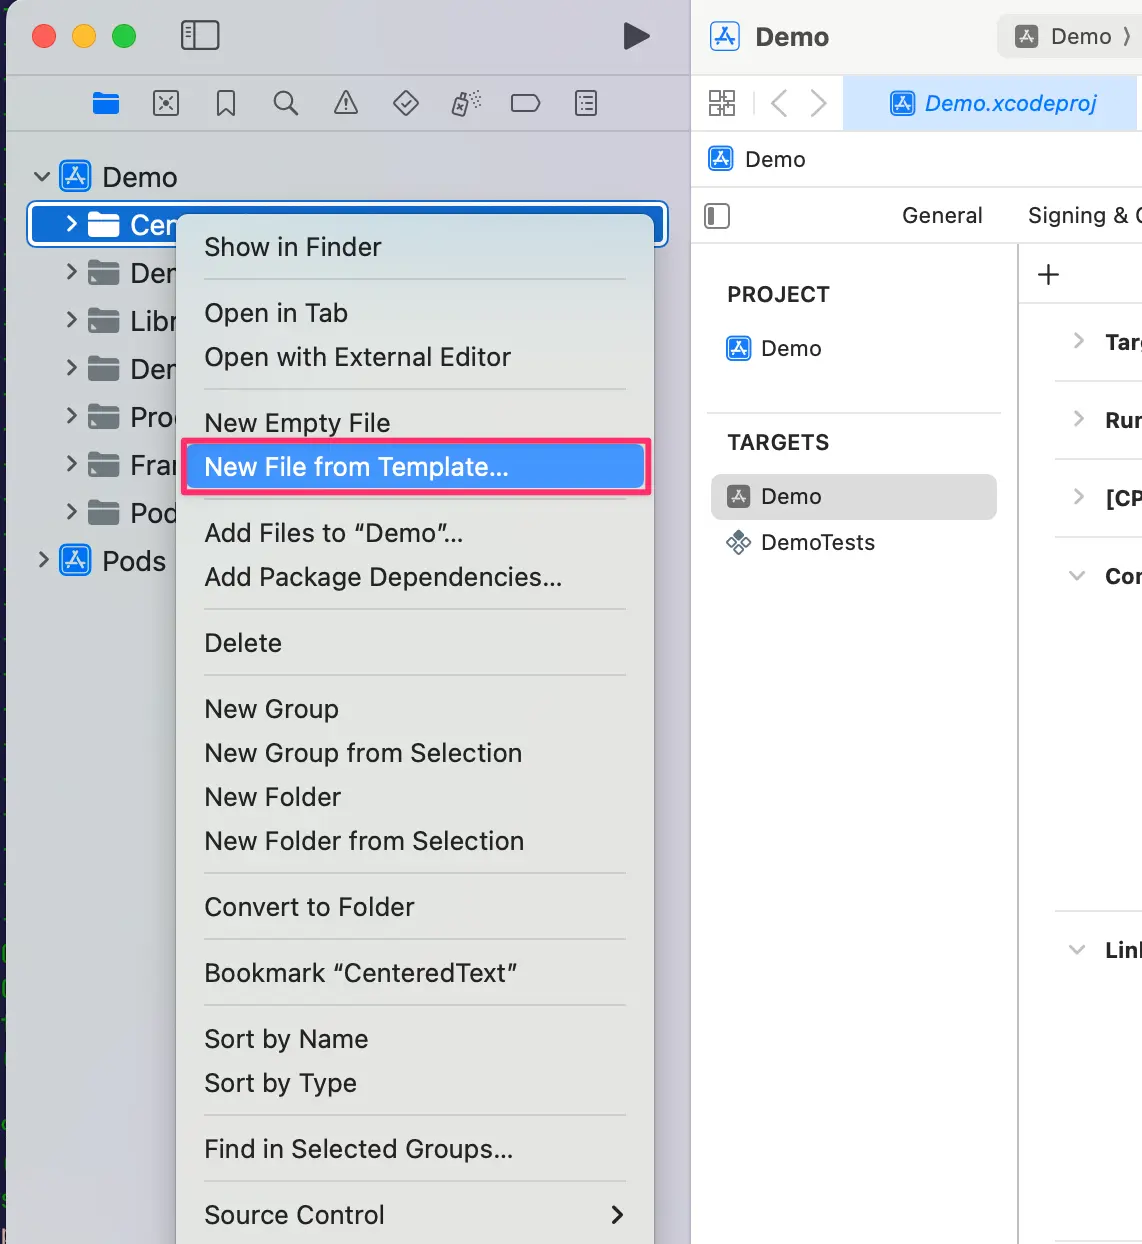
- 使用
Objective-C File範本,並將其命名為RCTWebView。
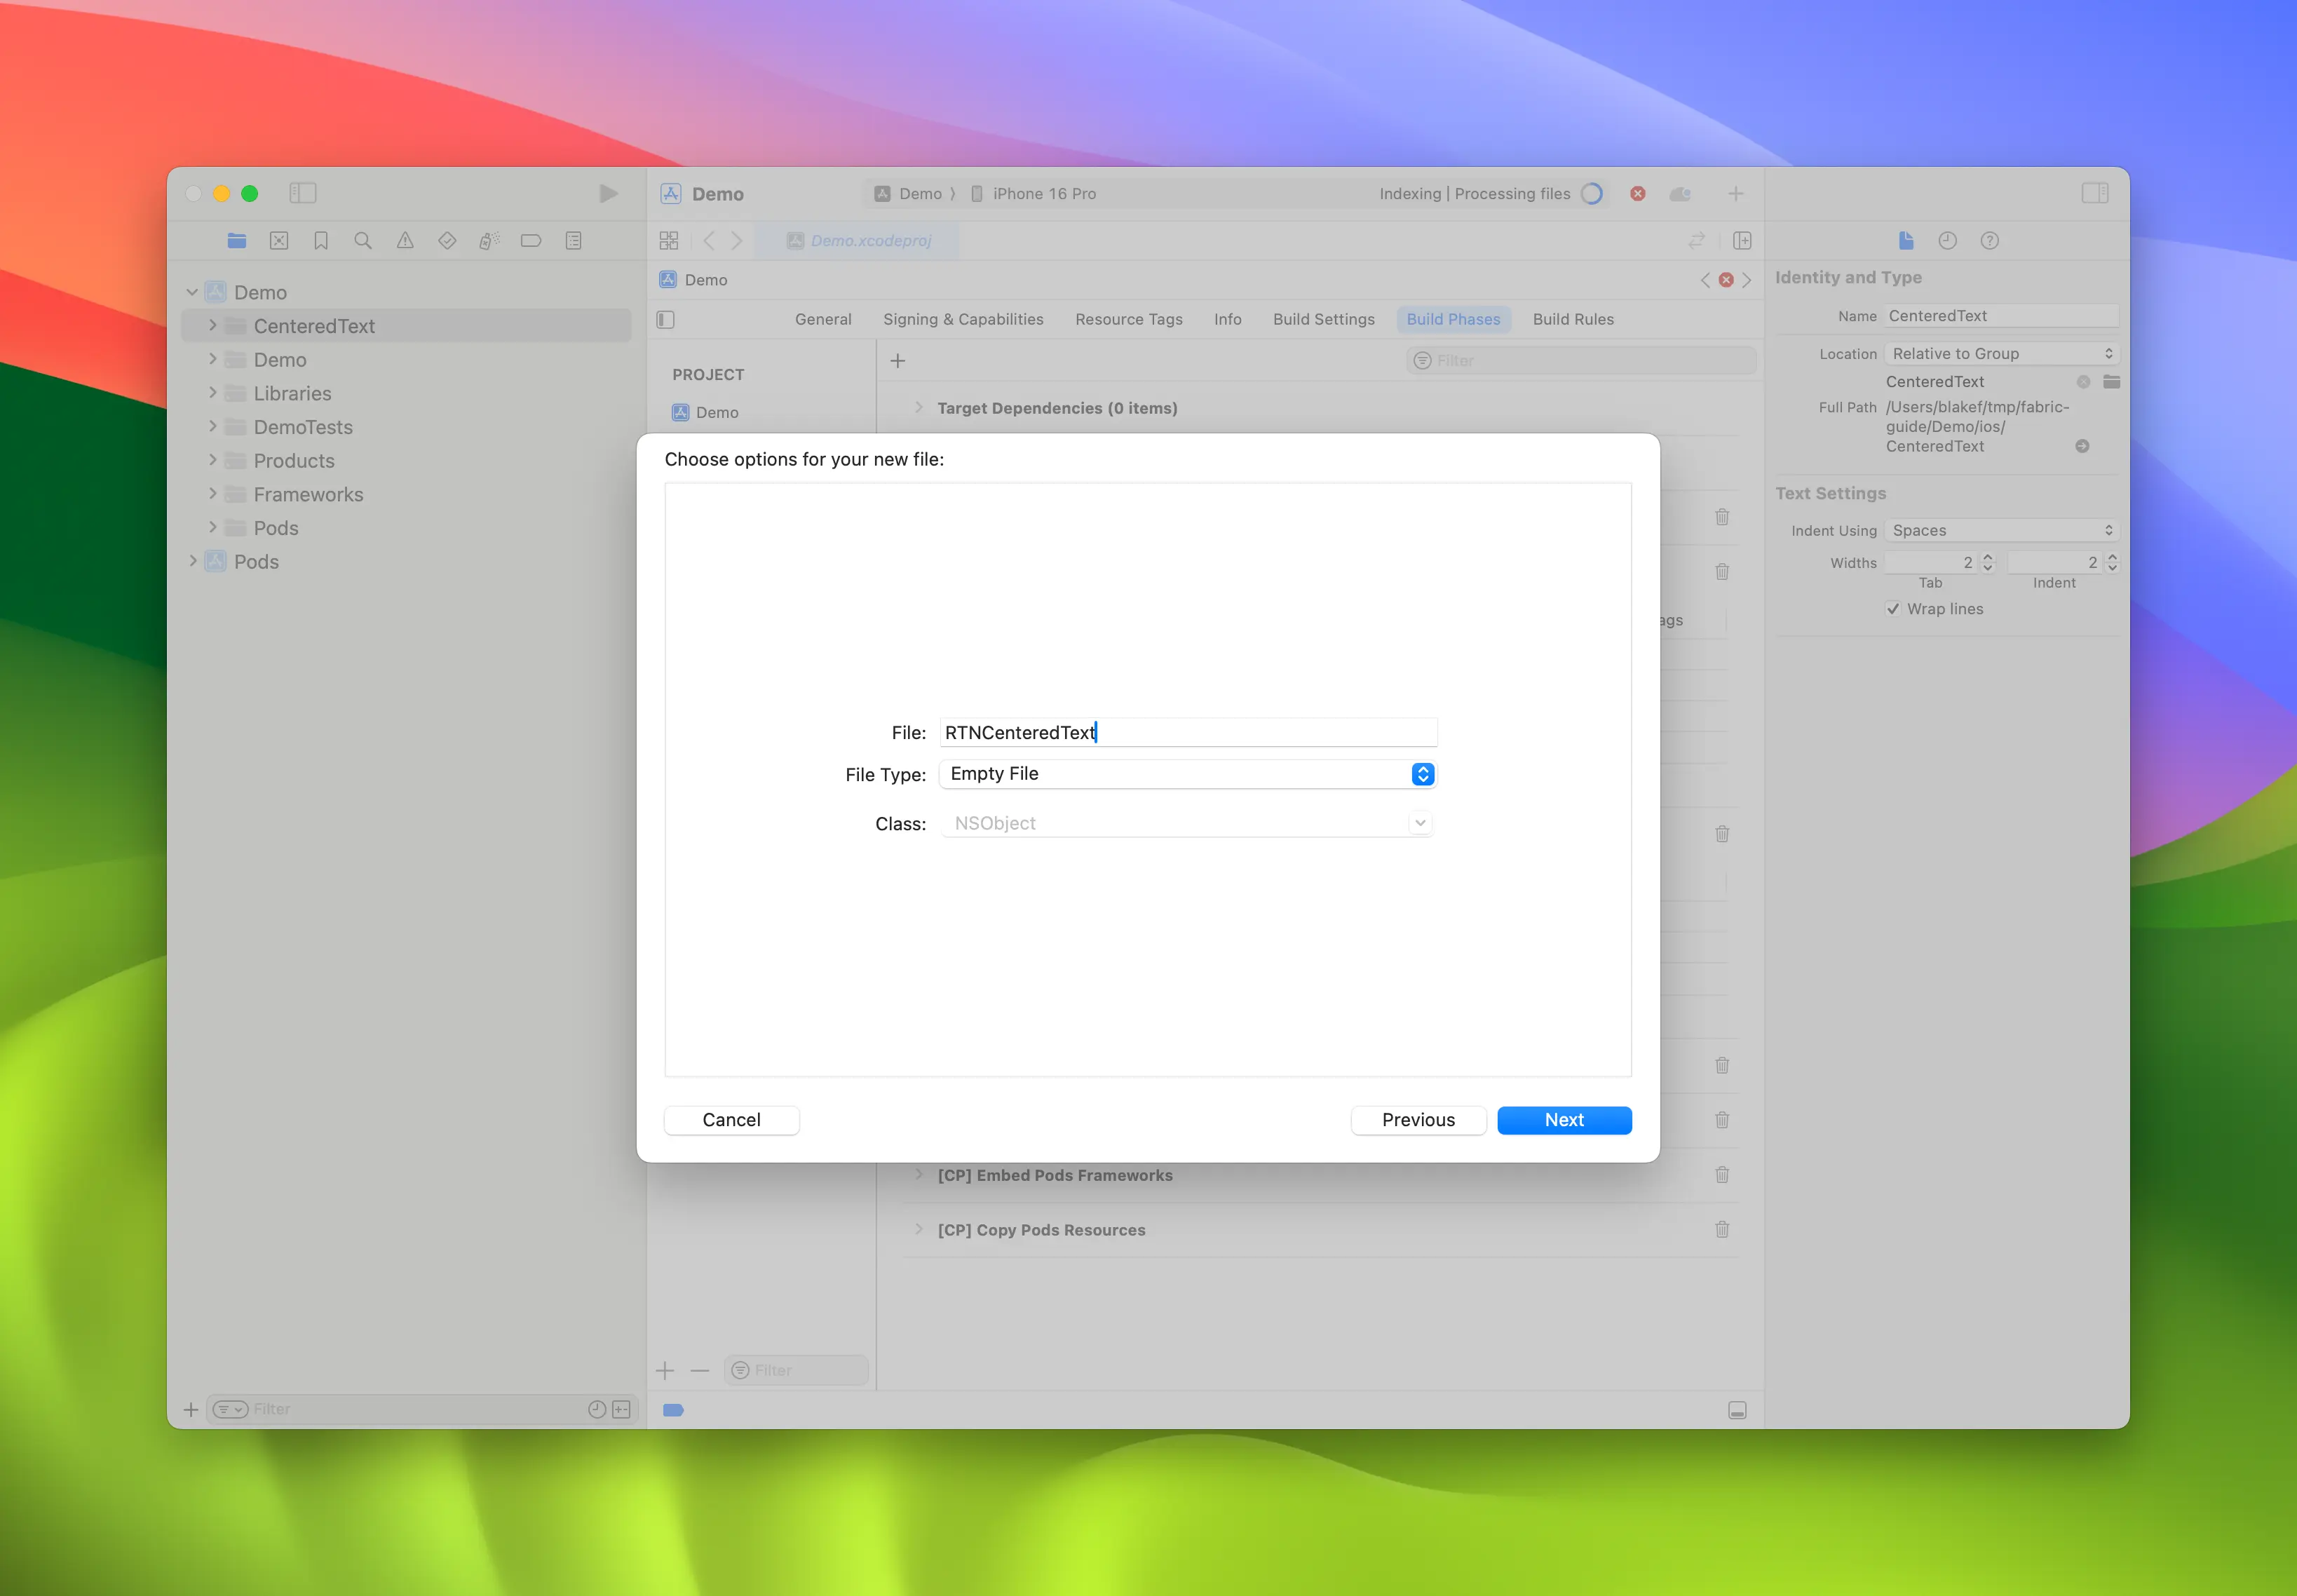
-
重複步驟 4 並建立名為
RCTWebView.h的標頭檔。 -
將
RCTWebView.m重新命名為RCTWebView.mm,使其成為 Objective-C++ 檔案。
Podfile
...
Demo
├── AppDelegate.swift
...
├── RCTWebView.h
└── RCTWebView.mm
建立標頭檔和實作檔案後,您可以開始實作它們。
這是 RCTWebView.h 檔案的程式碼,它宣告了組件介面。
#import <React/RCTViewComponentView.h>
#import <UIKit/UIKit.h>

NS_ASSUME_NONNULL_BEGIN

@interface RCTWebView : RCTViewComponentView

// You would declare native methods you'd want to access from the view here

@end

NS_ASSUME_NONNULL_END
此類別定義了擴展 RCTViewComponentView 類別的 RCTWebView。這是所有原生組件的基底類別,由 React Native 提供。
實作檔案 (RCTWebView.mm) 的程式碼如下
#import "RCTWebView.h"

#import <react/renderer/components/AppSpec/ComponentDescriptors.h>
#import <react/renderer/components/AppSpec/EventEmitters.h>
#import <react/renderer/components/AppSpec/Props.h>
#import <react/renderer/components/AppSpec/RCTComponentViewHelpers.h>
#import <WebKit/WebKit.h>

using namespace facebook::react;

@interface RCTWebView () <RCTCustomWebViewViewProtocol, WKNavigationDelegate>
@end

@implementation RCTWebView {
  NSURL * _sourceURL;
  WKWebView * _webView;
}

-(instancetype)init
{
  if(self = [super init]) {
    _webView = [WKWebView new];
    _webView.navigationDelegate = self;
    [self addSubview:_webView];
  }
  return self;
}

- (void)updateProps:(Props::Shared const &)props oldProps:(Props::Shared const &)oldProps
{
  const auto &oldViewProps = *std::static_pointer_cast<CustomWebViewProps const>(_props);
  const auto &newViewProps = *std::static_pointer_cast<CustomWebViewProps const>(props);

  // Handle your props here
  if (oldViewProps.sourceURL != newViewProps.sourceURL) {
    NSString *urlString = [NSString stringWithCString:newViewProps.sourceURL.c_str() encoding:NSUTF8StringEncoding];
    _sourceURL = [NSURL URLWithString:urlString];
    if ([self urlIsValid:newViewProps.sourceURL]) {
      [_webView loadRequest:[NSURLRequest requestWithURL:_sourceURL]];
    }
  }

  [super updateProps:props oldProps:oldProps];
}

-(void)layoutSubviews
{
  [super layoutSubviews];
  _webView.frame = self.bounds;

}

#pragma mark - WKNavigationDelegate

-(void)webView:(WKWebView *)webView didFinishNavigation:(WKNavigation *)navigation
{
  CustomWebViewEventEmitter::OnScriptLoaded result = CustomWebViewEventEmitter::OnScriptLoaded{CustomWebViewEventEmitter::OnScriptLoadedResult::Success};
  self.eventEmitter.onScriptLoaded(result);
}

- (BOOL)urlIsValid:(std::string)propString
{
  if (propString.length() > 0 && !_sourceURL) {
    CustomWebViewEventEmitter::OnScriptLoaded result = CustomWebViewEventEmitter::OnScriptLoaded{CustomWebViewEventEmitter::OnScriptLoadedResult::Error};

    self.eventEmitter.onScriptLoaded(result);
    return NO;
  }
  return YES;
}

// Event emitter convenience method
- (const CustomWebViewEventEmitter &)eventEmitter
{
  return static_cast<const CustomWebViewEventEmitter &>(*_eventEmitter);
}

+ (ComponentDescriptorProvider)componentDescriptorProvider
{
  return concreteComponentDescriptorProvider<CustomWebViewComponentDescriptor>();
}

@end
此程式碼以 Objective-C++ 編寫,包含各種詳細資訊
@interface實作了兩個協定RCTCustomWebViewViewProtocol,由 Codegen 產生;WKNavigationDelegate,由 WebKit 框架提供,用於處理網頁檢視導覽事件;
init方法,用於實例化WKWebView、將其新增至子檢視並設定navigationDelegate;updateProps方法,當組件的 props 變更時,React Native 會呼叫該方法;layoutSubviews方法,描述自訂檢視需要如何佈局;webView:didFinishNavigation:方法,讓您可以處理當WKWebView完成載入頁面時要執行的操作;urlIsValid:(std::string)propString方法,檢查接收為 prop 的 URL 是否有效;eventEmitter方法,這是一個實用程式,用於擷取強型別eventEmitter實例componentDescriptorProvider,傳回 Codegen 產生的ComponentDescriptor;
新增 WebKit 框架
只有在我們建立 Web 檢視時才需要此步驟。iOS 上的 Web 組件需要連結到 Apple 提供的 WebKit 框架。如果您的組件不需要存取 Web 特定的功能,您可以跳過此步驟。
網頁檢視需要存取 Apple 透過 Xcode 和裝置隨附的其中一個框架提供的某些功能:WebKit。您可以在原生程式碼中看到它,方法是查看 RCTWebView.mm 中新增的 #import <WebKit/WebKit.h> 行。
若要在您的應用程式中連結 WebKit 框架,請按照以下步驟操作
- 在 Xcode 中,按一下您的專案
- 選取應用程式目標
- 選取 General 標籤
- 向下捲動直到找到「Frameworks, Libraries, and Embedded Contents」區段,然後按下
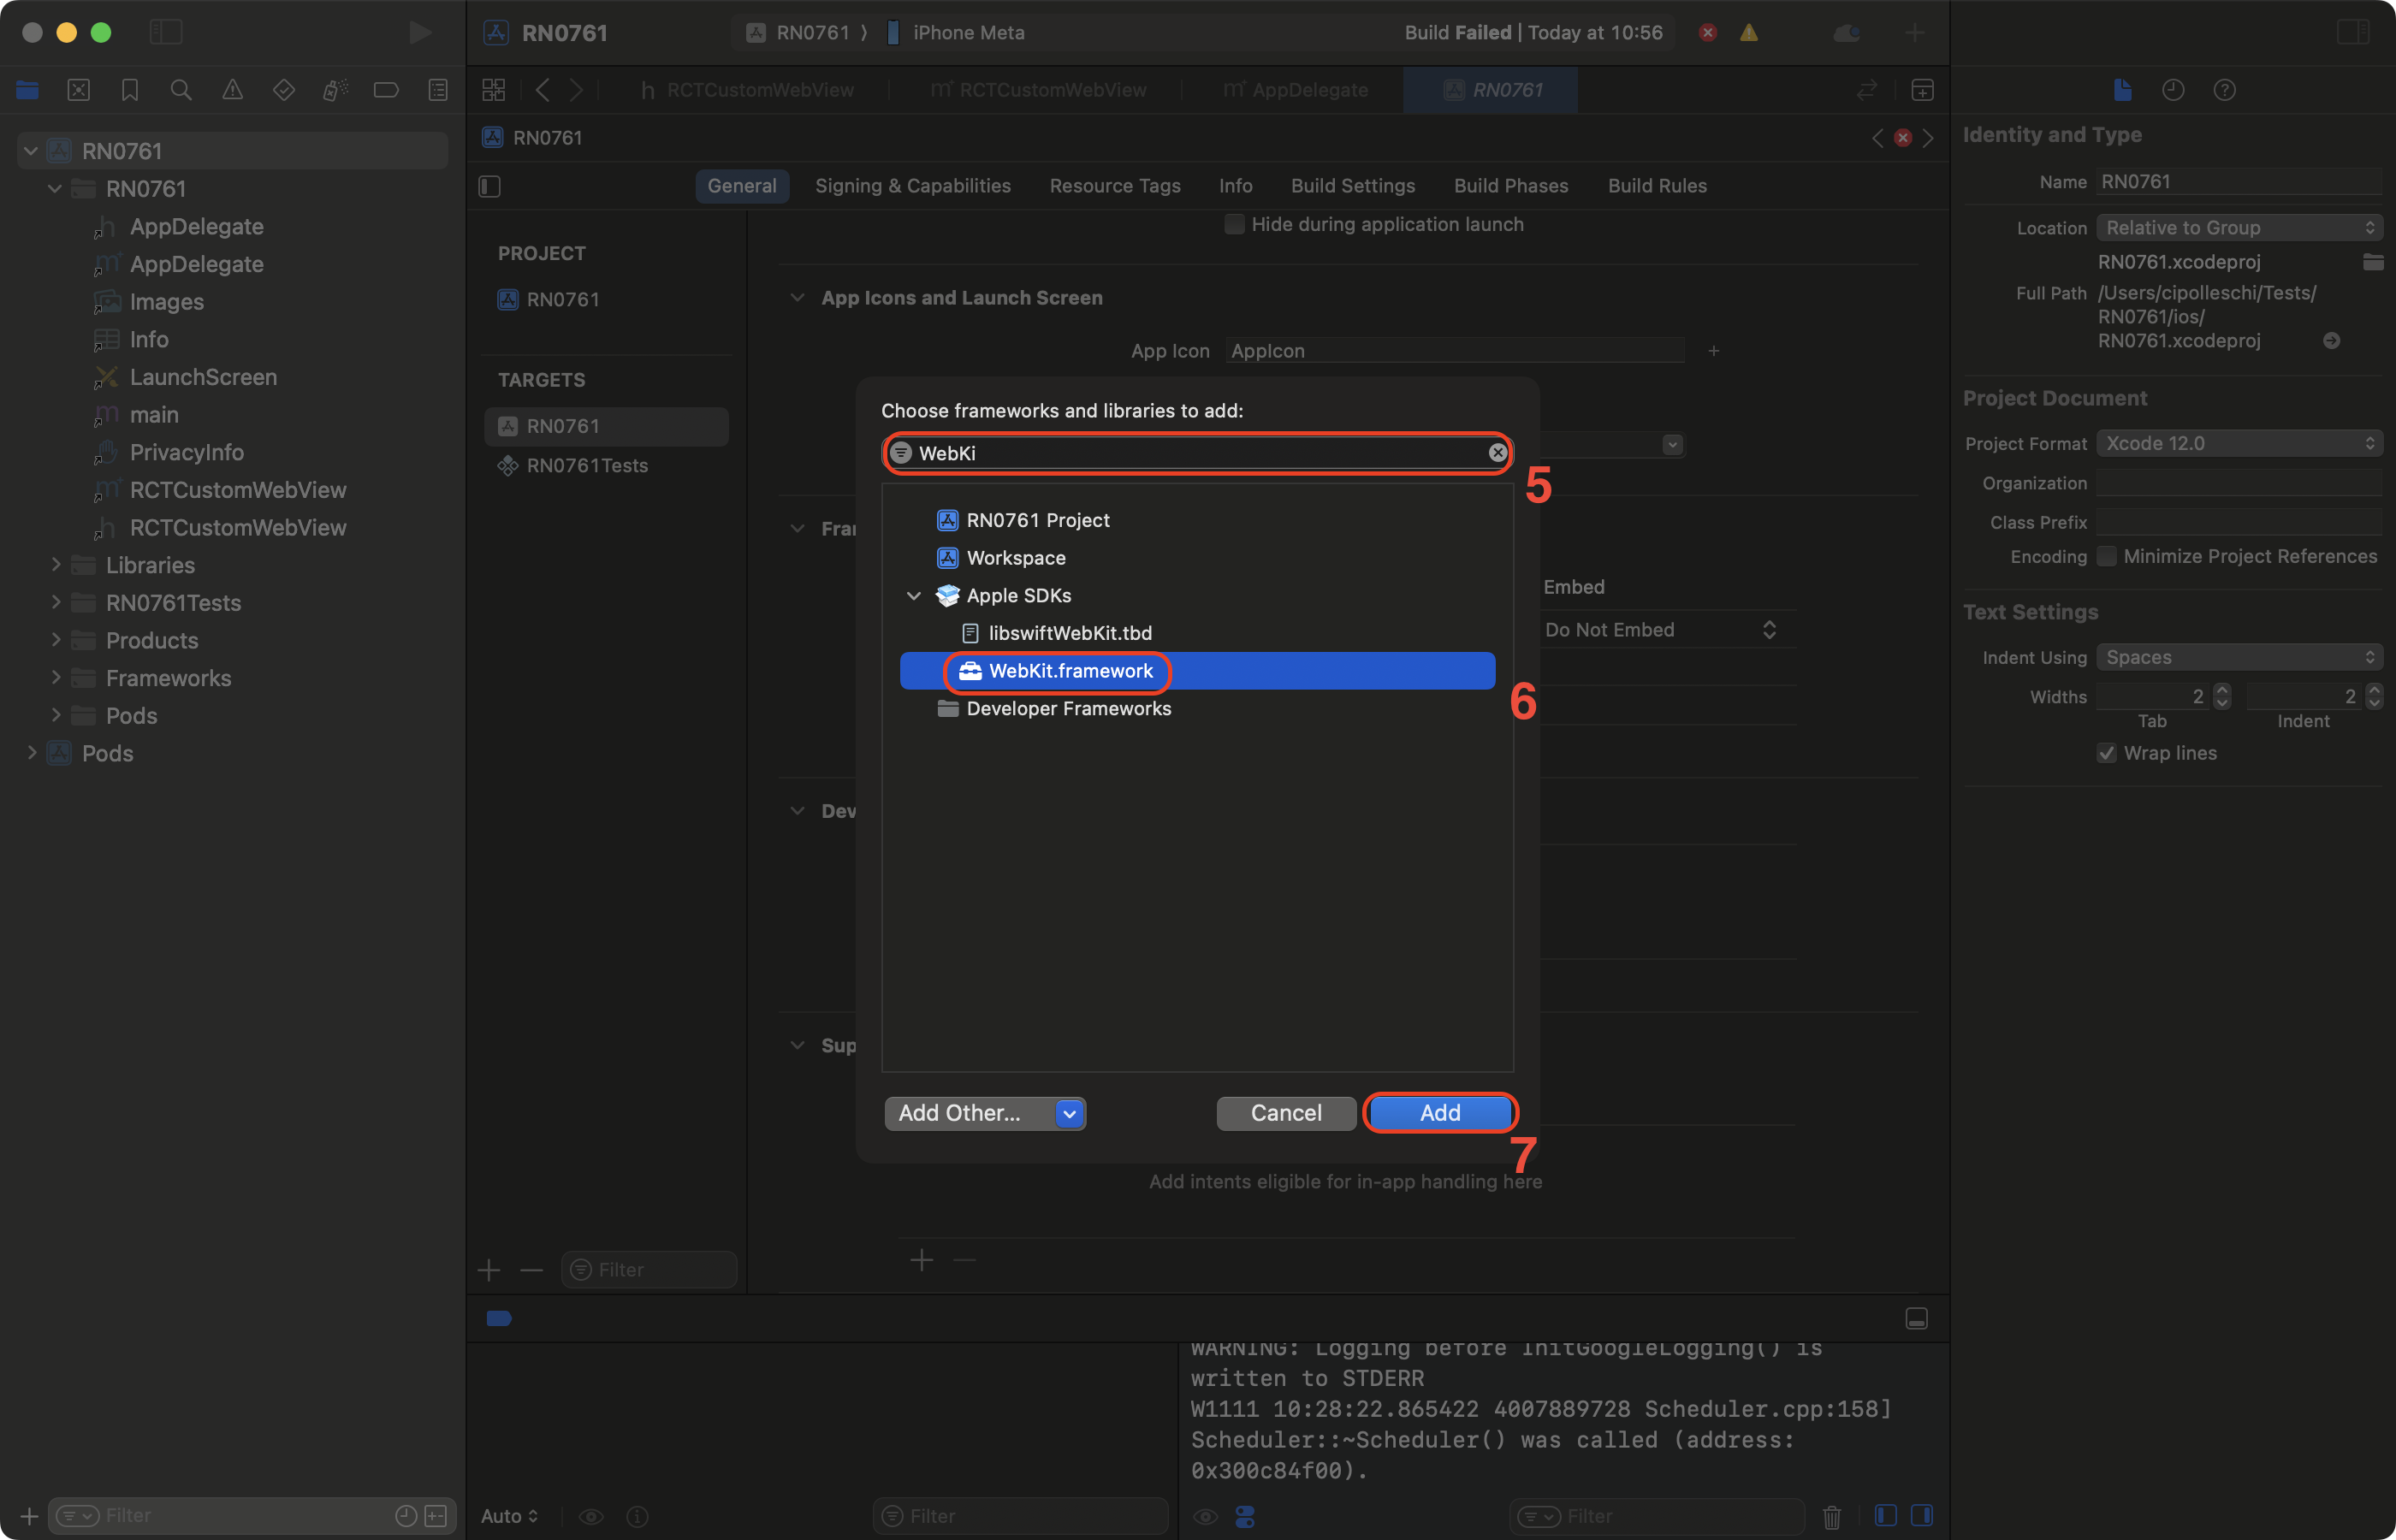
+按鈕
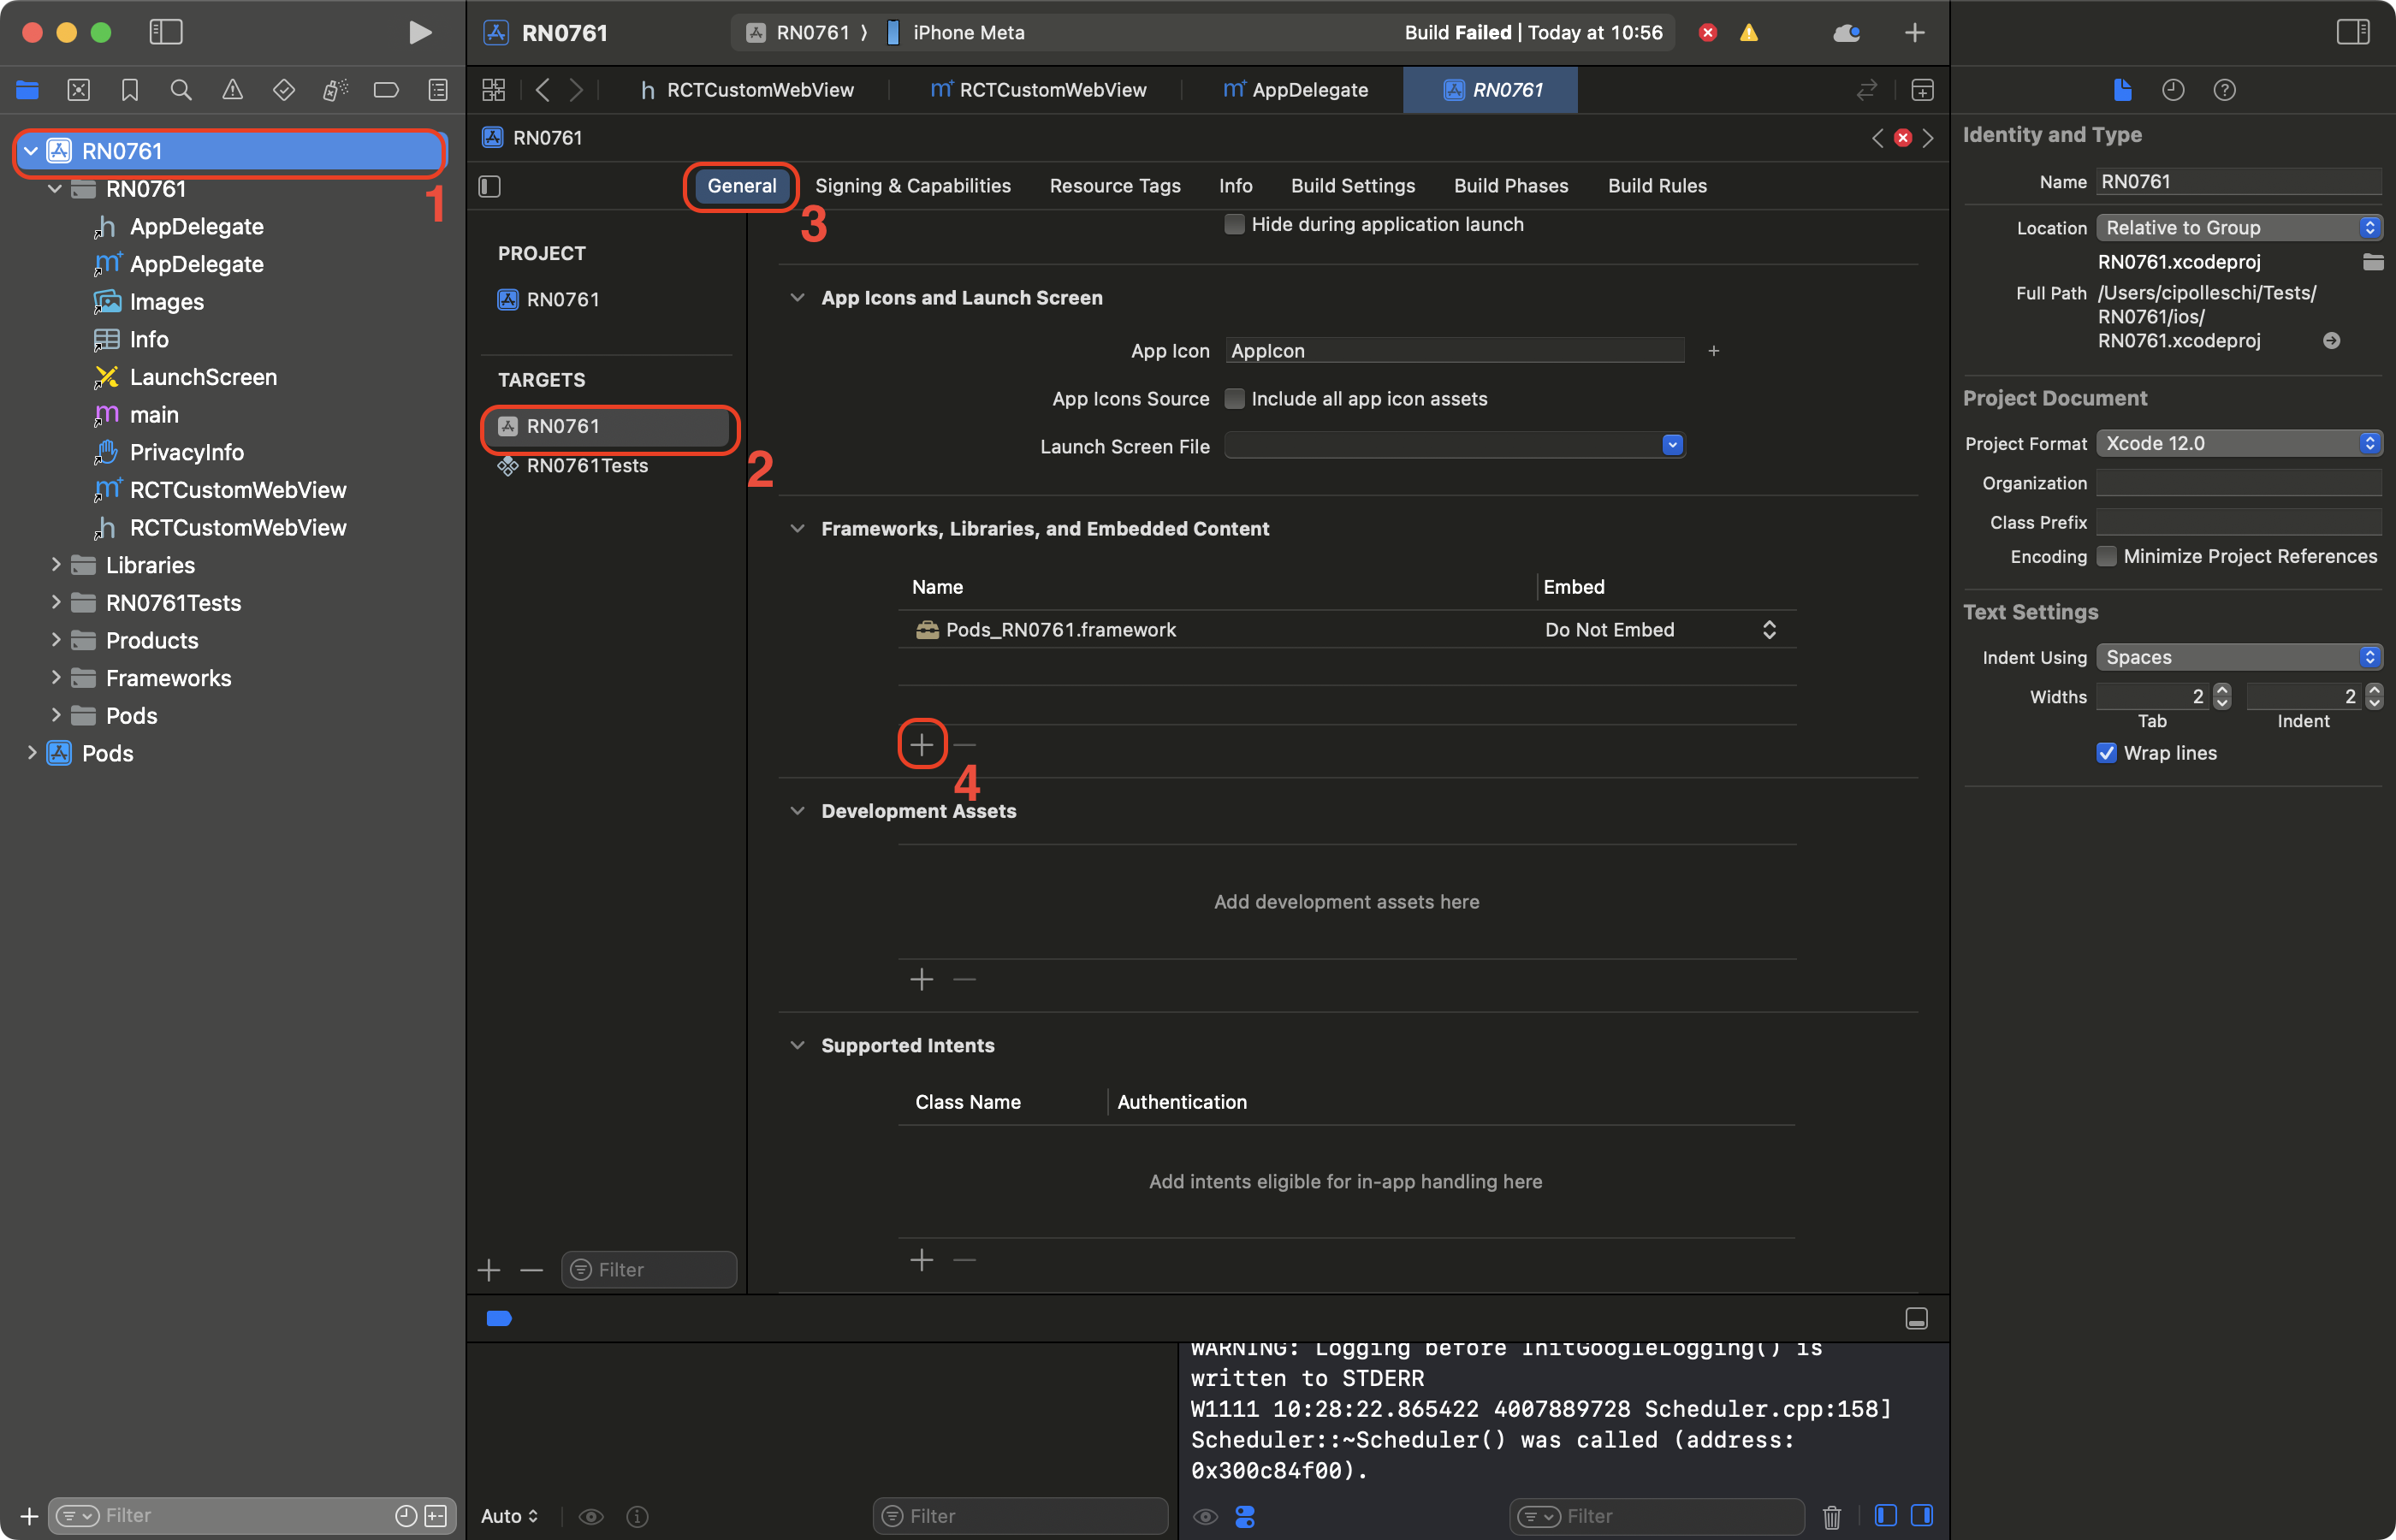
- 在搜尋欄中,篩選 WebKit
- 選取 WebKit 框架
- 按一下新增。
3. 使用您的原生組件
最後,您可以在您的應用程式中使用新的組件。更新您產生的 App.tsx 為
import React from 'react';
import {Alert, StyleSheet, View} from 'react-native';
import WebView from './specs/WebViewNativeComponent';

function App(): React.JSX.Element {
  return (
    <View style={styles.container}>
      <WebView
        sourceURL="https://react.dev.org.tw/"
        style={styles.webview}
        onScriptLoaded={() => {
          Alert.alert('Page Loaded');
        }}
      />
    </View>
  );
}

const styles = StyleSheet.create({
  container: {
    flex: 1,
    alignItems: 'center',
    alignContent: 'center',
  },
  webview: {
    width: '100%',
    height: '100%',
  },
});

export default App;
此程式碼建立一個應用程式,該應用程式使用我們建立的新 WebView 組件來載入 react.dev 網站。
當網頁載入時,應用程式也會顯示警示。
4. 使用 WebView 組件執行您的應用程式
- Android
- iOS
yarn run android
yarn run ios
| Android | iOS |
|---|---|
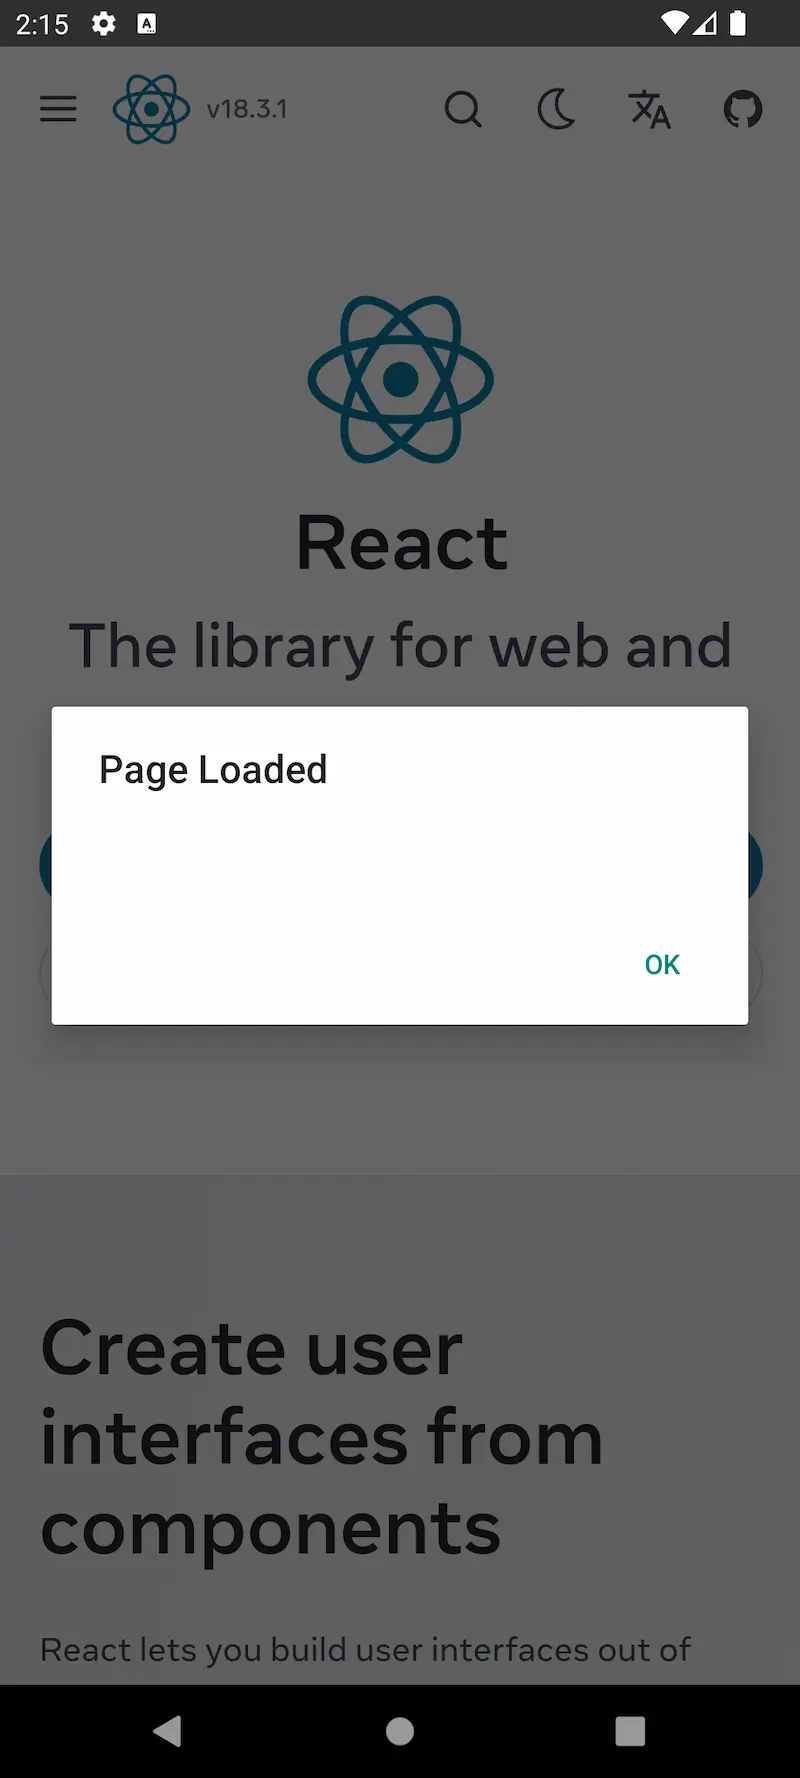 | 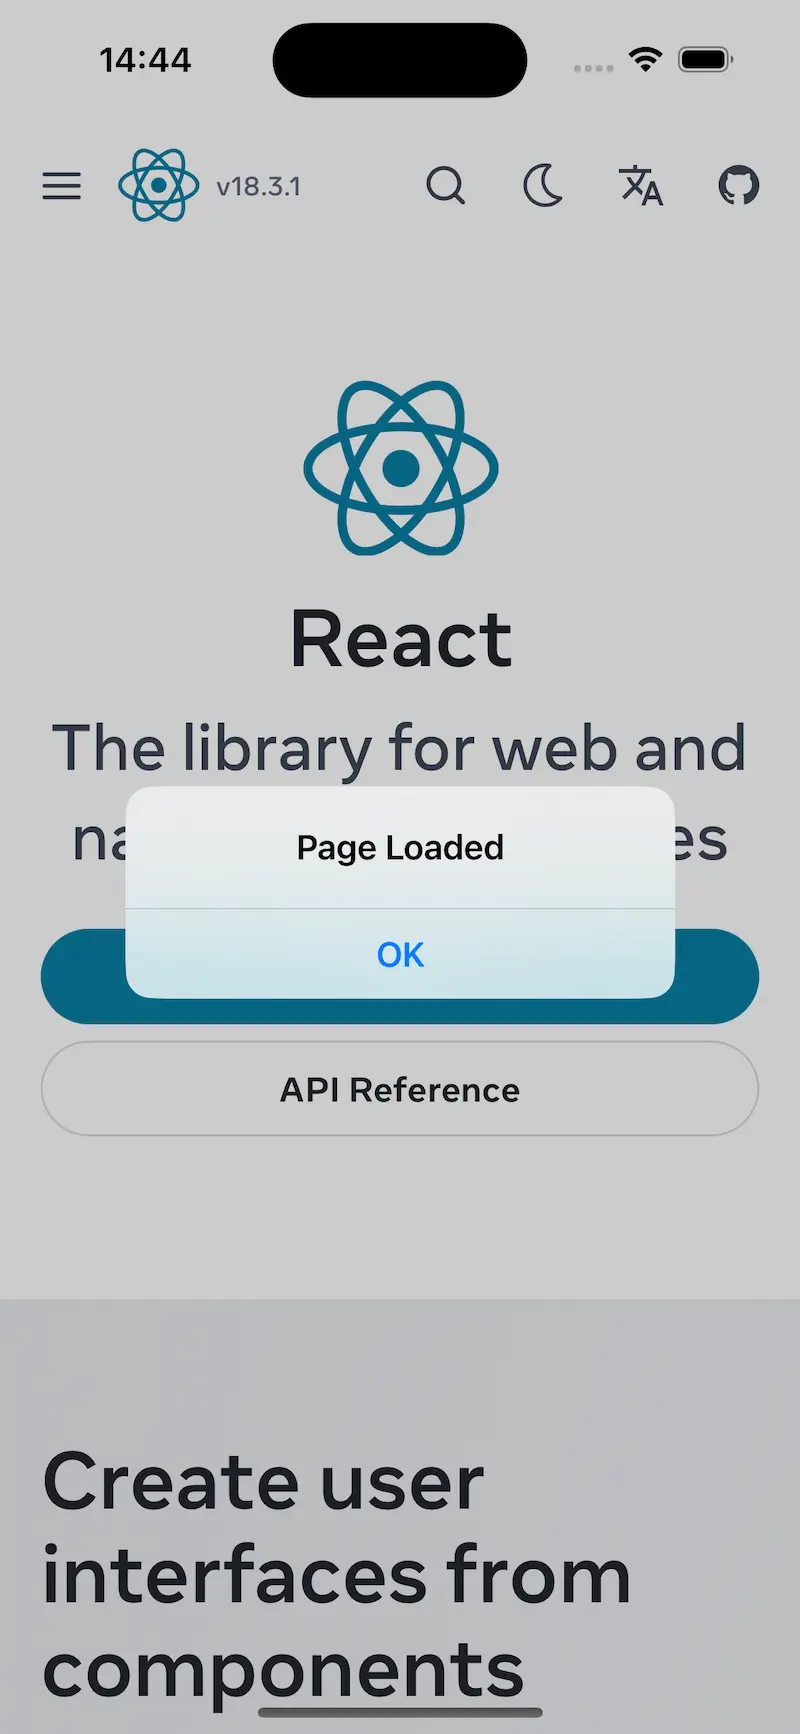 |