與現有應用程式整合
當您從頭開始建立新的行動應用程式時,React Native 非常棒。然而,它也很適合將單一視圖或使用者流程新增至現有的原生應用程式。透過幾個步驟,您可以新增基於 React Native 的新功能、畫面、視圖等。
具體的步驟會因您目標的平台而異。
- Android (Java & Kotlin)
- iOS (Objective-C 和 Swift)
主要概念
將 React Native 組件整合到您的 Android 應用程式中的關鍵在於
- 設定正確的目錄結構。
- 安裝必要的 NPM 依賴項。
- 將 React Native 新增至您的 Gradle 設定。
- 為您的第一個 React Native 畫面編寫 TypeScript 程式碼。
- 使用 ReactActivity 將 React Native 與您的 Android 程式碼整合。
- 透過執行 bundler 並查看您的應用程式運作情況來測試您的整合。
使用社群範本
在您遵循本指南的同時,我們建議您使用 React Native 社群範本 作為參考。該範本包含一個最小的 Android 應用程式,將幫助您了解如何將 React Native 整合到現有的 Android 應用程式中。
先決條件
請遵循關於設定您的開發環境和使用不使用框架的 React Native的指南,為建置 Android 的 React Native 應用程式設定您的開發環境。本指南也假設您熟悉 Android 開發的基礎知識,例如建立 Activity 和編輯 AndroidManifest.xml 檔案。
1. 設定目錄結構
為了確保流暢的體驗,為您整合的 React Native 專案建立一個新資料夾,然後將您現有的 Android 專案移至 /android 子資料夾。
2. 安裝 NPM 依賴項
前往根目錄並執行以下命令
curl -O https://raw.githubusercontent.com/react-native-community/template/refs/heads/0.75-stable/template/package.json
這會將 社群範本中的 package.json 檔案 複製到您的專案中。
接下來,透過執行以下命令安裝 NPM 套件
- npm
- Yarn
npm install
yarn install
安裝過程已建立一個新的 node_modules 資料夾。此資料夾儲存建置專案所需的所有 JavaScript 依賴項。
將 node_modules/ 新增至您的 .gitignore 檔案(此處為 社群預設檔案)。
3. 將 React Native 新增至您的應用程式
設定 Gradle
React Native 使用 React Native Gradle Plugin 來設定您的依賴項和專案設定。
首先,讓我們編輯您的 settings.gradle 檔案,新增以下幾行程式碼(如 社群範本 建議)
// Configures the React Native Gradle Settings plugin used for autolinking
pluginManagement { includeBuild("../node_modules/@react-native/gradle-plugin") }
plugins { id("com.facebook.react.settings") }
extensions.configure(com.facebook.react.ReactSettingsExtension){ ex -> ex.autolinkLibrariesFromCommand() }
// If using .gradle.kts files:
// extensions.configure<com.facebook.react.ReactSettingsExtension> { autolinkLibrariesFromCommand() }
includeBuild("../node_modules/@react-native/gradle-plugin")

// Include your existing Gradle modules here.
// include(":app")
然後您需要開啟您的頂層 build.gradle 並包含此行程式碼(如 社群範本 建議)
buildscript {
    repositories {
        google()
        mavenCentral()
    }
    dependencies {
        classpath("com.android.tools.build:gradle:7.3.1")
+       classpath("com.facebook.react:react-native-gradle-plugin")
    }
}
這確保 React Native Gradle Plugin (RNGP) 在您的專案中可用。最後,將這些程式碼行新增至您的應用程式 build.gradle 檔案中(這是一個不同的 build.gradle 檔案,通常在您的 app 資料夾中 - 您可以使用 社群範本檔案作為參考)
apply plugin: "com.android.application"
+apply plugin: "com.facebook.react"

repositories {
    mavenCentral()
}

dependencies {
    // Other dependencies here
+   // Note: we intentionally don't specify the version number here as RNGP will take care of it.
+   // If you don't use the RNGP, you'll have to specify version manually.
+   implementation("com.facebook.react:react-android")
+   implementation("com.facebook.react:hermes-android")
}

+react {
+   // Needed to enable Autolinking - https://github.com/react-native-community/cli/blob/master/docs/autolinking.md
+   autolinkLibrariesWithApp()
+}
最後,開啟您的應用程式 gradle.properties 檔案並新增以下程式碼行(此處為 社群範本檔案作為參考)
+reactNativeArchitectures=armeabi-v7a,arm64-v8a,x86,x86_64
+newArchEnabled=true
+hermesEnabled=true
設定您的 manifest
首先,確保您的 AndroidManifest.xml 中具有網際網路權限
<manifest xmlns:android="http://schemas.android.com/apk/res/android">

+   <uses-permission android:name="android.permission.INTERNET" />

    <application
      android:name=".MainApplication">
    </application>
</manifest>
然後,您需要在您的 debug AndroidManifest.xml 中啟用 明文流量
<?xml version="1.0" encoding="utf-8"?>
<manifest xmlns:android="http://schemas.android.com/apk/res/android"
    xmlns:tools="http://schemas.android.com/tools">

    <application
+       android:usesCleartextTraffic="true"
+       tools:targetApi="28"
    />
</manifest>
與往常一樣,此處提供社群範本中的 AndroidManifest.xml 檔案以供參考:main 和 debug
這是必要的,因為您的應用程式將透過 HTTP 與您的本地 bundler [Metro][https://metrobundler.dev/] 通訊。透過 HTTP。
請確保您僅將此新增至您的 debug manifest。
4. 編寫 TypeScript 程式碼
現在我們將實際修改原生 Android 應用程式以整合 React Native。
我們要編寫的第一段程式碼是實際的 React Native 程式碼,用於將整合到我們應用程式中的新畫面。
建立 index.js 檔案
首先,在您的 React Native 專案的根目錄中建立一個空的 index.js 檔案。
index.js 是 React Native 應用程式的起點,而且始終是必需的。它可以是一個小檔案,import 屬於您的 React Native 組件或應用程式的其他檔案,或者它可以包含所需的所有程式碼。
我們的 index.js 應如下所示(此處為 社群範本檔案作為參考)
import {AppRegistry} from 'react-native';
import App from './App';

AppRegistry.registerComponent('HelloWorld', () => App);
建立 App.tsx 檔案
讓我們建立一個 App.tsx 檔案。這是一個 TypeScript 檔案,可以具有 JSX 表達式。它包含我們將整合到我們的 Android 應用程式中的根 React Native 組件(連結)
import React from 'react';
import {
  SafeAreaView,
  ScrollView,
  StatusBar,
  StyleSheet,
  Text,
  useColorScheme,
  View,
} from 'react-native';

import {
  Colors,
  DebugInstructions,
  Header,
  ReloadInstructions,
} from 'react-native/Libraries/NewAppScreen';

function App(): React.JSX.Element {
  const isDarkMode = useColorScheme() === 'dark';

  const backgroundStyle = {
    backgroundColor: isDarkMode ? Colors.darker : Colors.lighter,
  };

  return (
    <SafeAreaView style={backgroundStyle}>
      <StatusBar
        barStyle={isDarkMode ? 'light-content' : 'dark-content'}
        backgroundColor={backgroundStyle.backgroundColor}
      />
      <ScrollView
        contentInsetAdjustmentBehavior="automatic"
        style={backgroundStyle}>
        <Header />
        <View
          style={{
            backgroundColor: isDarkMode
              ? Colors.black
              : Colors.white,
            padding: 24,
          }}>
          <Text style={styles.title}>Step One</Text>
          <Text>
            Edit <Text style={styles.bold}>App.tsx</Text> to
            change this screen and see your edits.
          </Text>
          <Text style={styles.title}>See your changes</Text>
          <ReloadInstructions />
          <Text style={styles.title}>Debug</Text>
          <DebugInstructions />
        </View>
      </ScrollView>
    </SafeAreaView>
  );
}

const styles = StyleSheet.create({
  title: {
    fontSize: 24,
    fontWeight: '600',
  },
  bold: {
    fontWeight: '700',
  },
});

export default App;
此處為 社群範本檔案作為參考
5. 與您的 Android 程式碼整合
我們現在需要新增一些原生程式碼,以便啟動 React Native 執行時並告知它呈現我們的 React 組件。
更新您的 Application 類別
首先,我們需要更新您的 Application 類別以正確初始化 React Native,如下所示
- Java
- Kotlin
package <your-package-here>;

import android.app.Application;
+import com.facebook.react.PackageList;
+import com.facebook.react.ReactApplication;
+import com.facebook.react.ReactHost;
+import com.facebook.react.ReactNativeHost;
+import com.facebook.react.ReactPackage;
+import com.facebook.react.defaults.DefaultNewArchitectureEntryPoint;
+import com.facebook.react.defaults.DefaultReactHost;
+import com.facebook.react.defaults.DefaultReactNativeHost;
+import com.facebook.soloader.SoLoader;
+import com.facebook.react.soloader.OpenSourceMergedSoMapping
+import java.util.List;

-class MainApplication extends Application {
+class MainApplication extends Application implements ReactApplication {
+ @Override
+ public ReactNativeHost getReactNativeHost() {
+   return new DefaultReactNativeHost(this) {
+     @Override
+     protected List<ReactPackage> getPackages() { return new PackageList(this).getPackages(); }
+     @Override
+     protected String getJSMainModuleName() { return "index"; }
+     @Override
+     public boolean getUseDeveloperSupport() { return BuildConfig.DEBUG; }
+     @Override
+     protected boolean isNewArchEnabled() { return BuildConfig.IS_NEW_ARCHITECTURE_ENABLED; }
+     @Override
+     protected Boolean isHermesEnabled() { return BuildConfig.IS_HERMES_ENABLED; }
+   };
+ }

+ @Override
+ public ReactHost getReactHost() {
+   return DefaultReactHost.getDefaultReactHost(getApplicationContext(), getReactNativeHost());
+ }

  @Override
  public void onCreate() {
    super.onCreate();
+   SoLoader.init(this, OpenSourceMergedSoMapping);
+   if (BuildConfig.IS_NEW_ARCHITECTURE_ENABLED) {
+     DefaultNewArchitectureEntryPoint.load();
+   }
  }
}
// package <your-package-here>

import android.app.Application
+import com.facebook.react.PackageList
+import com.facebook.react.ReactApplication
+import com.facebook.react.ReactHost
+import com.facebook.react.ReactNativeHost
+import com.facebook.react.ReactPackage
+import com.facebook.react.defaults.DefaultNewArchitectureEntryPoint.load
+import com.facebook.react.defaults.DefaultReactHost.getDefaultReactHost
+import com.facebook.react.defaults.DefaultReactNativeHost
+import com.facebook.soloader.SoLoader
+import com.facebook.react.soloader.OpenSourceMergedSoMapping

-class MainApplication : Application() {
+class MainApplication : Application(), ReactApplication {

+ override val reactNativeHost: ReactNativeHost =
+      object : DefaultReactNativeHost(this) {
+        override fun getPackages(): List<ReactPackage> = PackageList(this).packages
+        override fun getJSMainModuleName(): String = "index"
+        override fun getUseDeveloperSupport(): Boolean = BuildConfig.DEBUG
+        override val isNewArchEnabled: Boolean = BuildConfig.IS_NEW_ARCHITECTURE_ENABLED
+        override val isHermesEnabled: Boolean = BuildConfig.IS_HERMES_ENABLED
+      }

+ override val reactHost: ReactHost
+   get() = getDefaultReactHost(applicationContext, reactNativeHost)

  override fun onCreate() {
    super.onCreate()
+   SoLoader.init(this, OpenSourceMergedSoMapping)
+   if (BuildConfig.IS_NEW_ARCHITECTURE_ENABLED) {
+     load()
+   }
  }
}
與往常一樣,此處提供 MainApplication.kt 社群範本檔案作為參考
建立 ReactActivity
最後,我們需要建立一個新的 Activity,它將擴展 ReactActivity 並託管 React Native 程式碼。此 activity 將負責啟動 React Native 執行時並呈現 React 組件。
- Java
- Kotlin
// package <your-package-here>;

import com.facebook.react.ReactActivity;
import com.facebook.react.ReactActivityDelegate;
import com.facebook.react.defaults.DefaultNewArchitectureEntryPoint;
import com.facebook.react.defaults.DefaultReactActivityDelegate;

public class MyReactActivity extends ReactActivity {

    @Override
    protected String getMainComponentName() {
        return "HelloWorld";
    }

    @Override
    protected ReactActivityDelegate createReactActivityDelegate() {
        return new DefaultReactActivityDelegate(this, getMainComponentName(), DefaultNewArchitectureEntryPoint.getFabricEnabled());
    }
}
// package <your-package-here>

import com.facebook.react.ReactActivity
import com.facebook.react.ReactActivityDelegate
import com.facebook.react.defaults.DefaultNewArchitectureEntryPoint.fabricEnabled
import com.facebook.react.defaults.DefaultReactActivityDelegate

class MyReactActivity : ReactActivity() {

    override fun getMainComponentName(): String = "HelloWorld"

    override fun createReactActivityDelegate(): ReactActivityDelegate =
        DefaultReactActivityDelegate(this, mainComponentName, fabricEnabled)
}
與往常一樣,此處提供 MainActivity.kt 社群範本檔案作為參考
每當您建立新的 Activity 時,您都需要將其新增至您的 AndroidManifest.xml 檔案。您還需要將 MyReactActivity 的主題設定為 Theme.AppCompat.Light.NoActionBar(或任何非 ActionBar 主題),否則您的應用程式將在您的 React Native 畫面上方呈現一個 ActionBar
<manifest xmlns:android="http://schemas.android.com/apk/res/android">

    <uses-permission android:name="android.permission.INTERNET" />

    <application
      android:name=".MainApplication">

+     <activity
+       android:name=".MyReactActivity"
+       android:label="@string/app_name"
+       android:theme="@style/Theme.AppCompat.Light.NoActionBar">
+     </activity>
    </application>
</manifest>
現在您的 activity 已準備好執行一些 JavaScript 程式碼。
6. 測試您的整合
您已完成將 React Native 與您的應用程式整合的所有基本步驟。現在我們將啟動 Metro bundler,將您的 TypeScript 應用程式程式碼建置到一個 bundle 中。Metro 的 HTTP 伺服器從您的開發環境上的 localhost 將 bundle 共用至模擬器或裝置。這允許 熱重載。
首先,您需要在您的專案根目錄中建立一個 metro.config.js 檔案,如下所示
const {getDefaultConfig} = require('@react-native/metro-config');
module.exports = getDefaultConfig(__dirname);
您可以查看社群範本檔案中的 metro.config.js 檔案 作為參考。
一旦您有了設定檔,您就可以執行 bundler。在您的專案根目錄中執行以下命令
- npm
- Yarn
npm start
yarn start
現在像平常一樣建置並執行您的 Android 應用程式。
一旦您在應用程式內到達 React 驅動的 Activity,它應該從開發伺服器載入 JavaScript 程式碼並顯示

在 Android Studio 中建立發行版本
您也可以使用 Android Studio 來建立您的發行版本!它與建立您先前存在的原生 Android 應用程式的發行版本一樣快速。
React Native Gradle Plugin 將負責將 JS 程式碼捆綁在您的 APK/App Bundle 中。
如果您未使用 Android Studio,您可以使用以下命令建立發行版本
cd android
# For a Release APK
./gradlew :app:assembleRelease
# For a Release AAB
./gradlew :app:bundleRelease
接下來呢?
此時,您可以像平常一樣繼續開發您的應用程式。請參閱我們的偵錯和部署文件,以了解更多關於使用 React Native 的資訊。
主要概念
將 React Native 組件整合到您的 iOS 應用程式中的關鍵在於
- 設定正確的目錄結構。
- 安裝必要的 NPM 依賴項。
- 將 React Native 新增至您的 Podfile 設定。
- 為您的第一個 React Native 畫面編寫 TypeScript 程式碼。
- 使用
RCTRootView將 React Native 與您的 iOS 程式碼整合。 - 透過執行 bundler 並查看您的應用程式運作情況來測試您的整合。
使用社群範本
在您遵循本指南的同時,我們建議您使用 React Native 社群範本 作為參考。該範本包含一個最小的 iOS 應用程式,將幫助您了解如何將 React Native 整合到現有的 iOS 應用程式中。
先決條件
請遵循關於設定您的開發環境和使用不使用框架的 React Native的指南,為建置 iOS 的 React Native 應用程式設定您的開發環境。本指南也假設您熟悉 iOS 開發的基礎知識,例如建立 UIViewController 和編輯 Podfile 檔案。
1. 設定目錄結構
為了確保流暢的體驗,為您整合的 React Native 專案建立一個新資料夾,然後將您現有的 iOS 專案移至 /ios 子資料夾。
2. 安裝 NPM 依賴項
前往根目錄並執行以下命令
curl -O https://raw.githubusercontent.com/react-native-community/template/refs/heads/0.78-stable/template/package.json
這會將 社群範本中的 package.json 檔案 複製到您的專案中。
接下來,透過執行以下命令安裝 NPM 套件
- npm
- Yarn
npm install
yarn install
安裝過程已建立一個新的 node_modules 資料夾。此資料夾儲存建置專案所需的所有 JavaScript 依賴項。
將 node_modules/ 新增至您的 .gitignore 檔案(此處為 社群預設檔案)。
3. 安裝開發工具
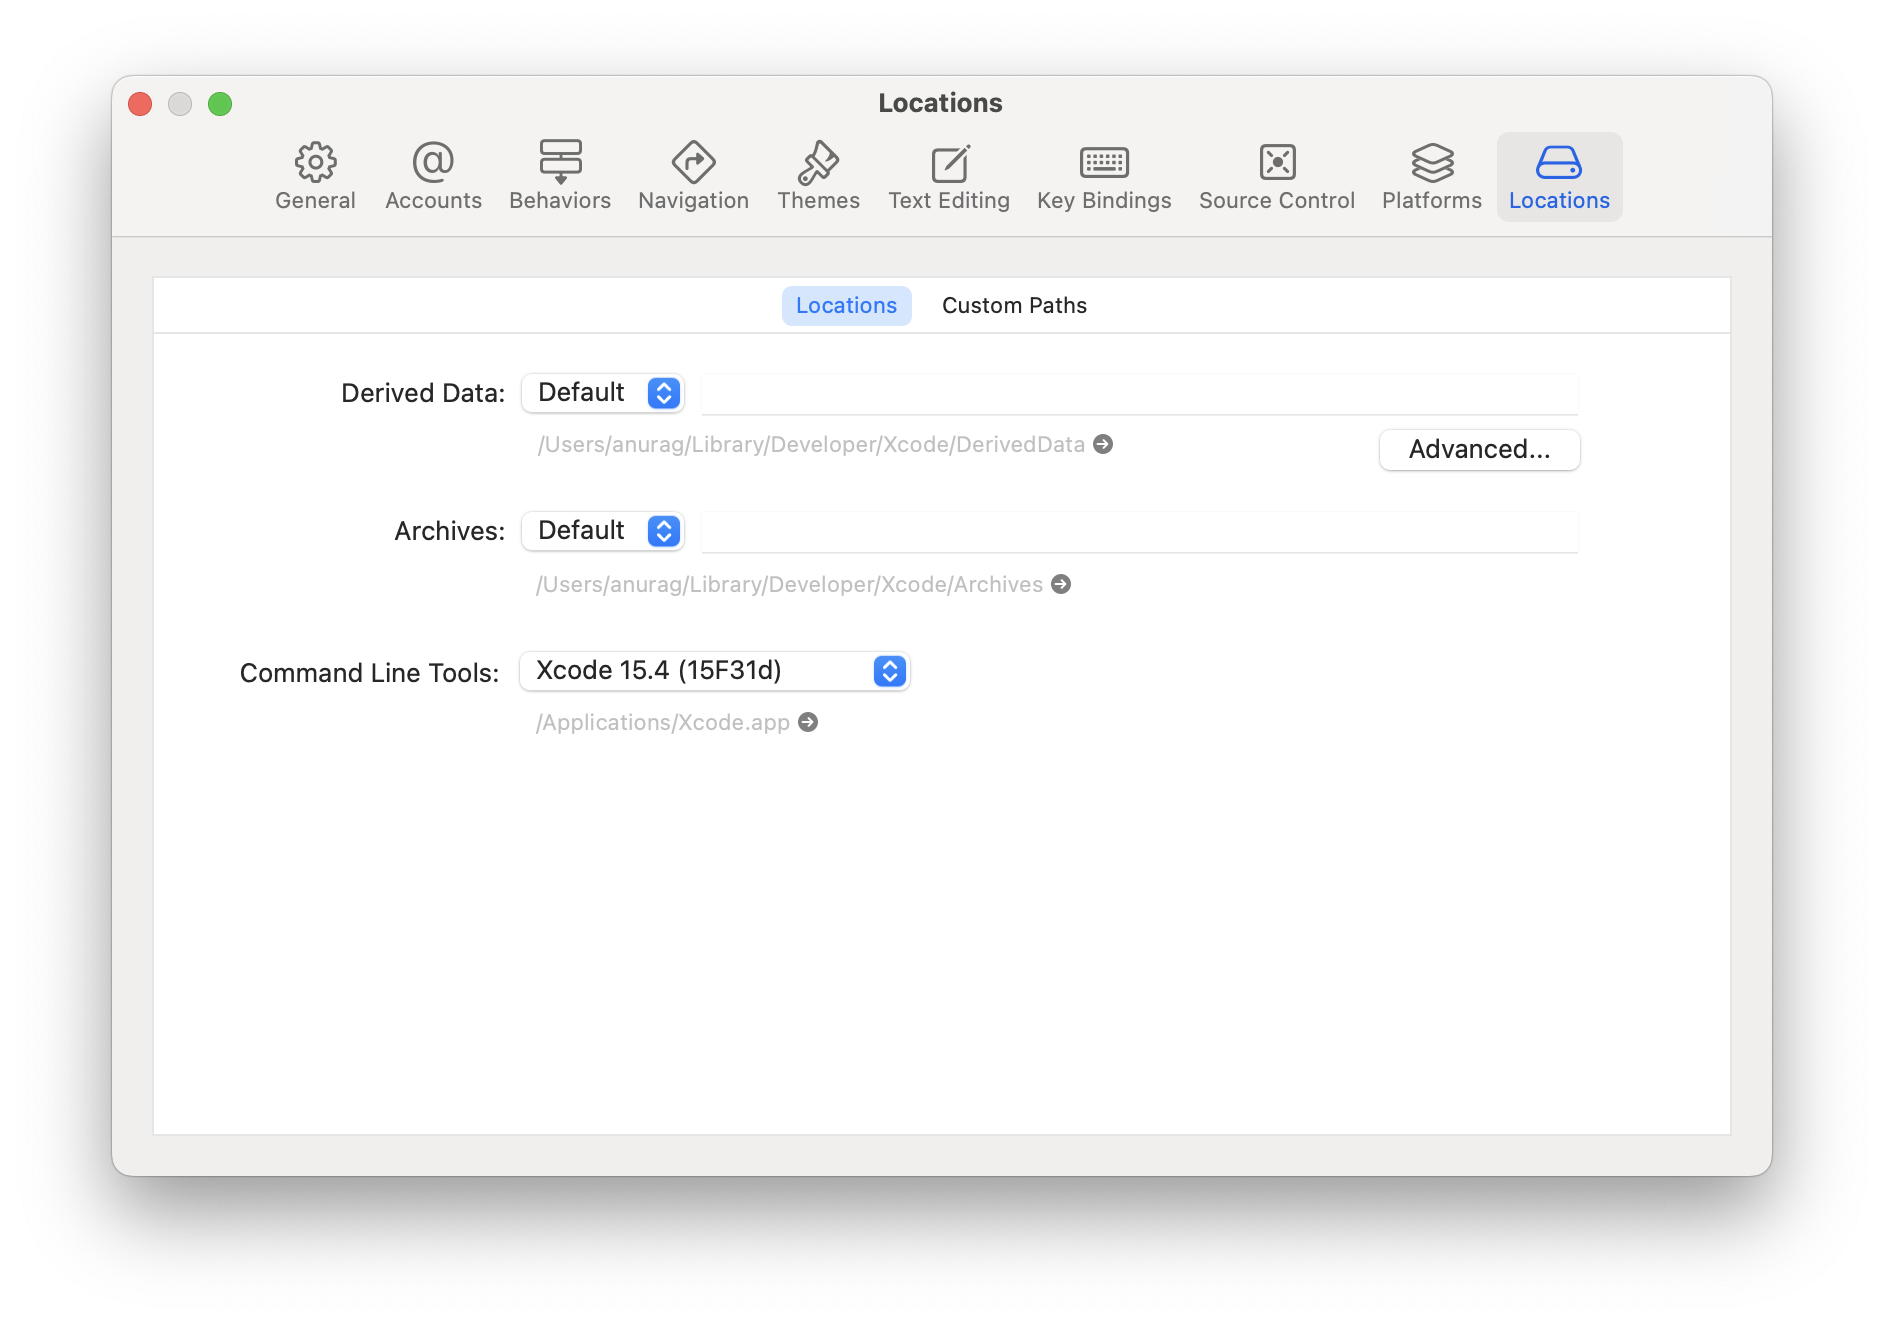
Xcode Command Line Tools
安裝 Command Line Tools。在 Xcode 選單中選擇設定... (或偏好設定...)。前往 Locations 面板,並透過在 Command Line Tools 下拉式選單中選擇最新版本來安裝工具。
CocoaPods
CocoaPods 是一個適用於 iOS 和 macOS 開發的套件管理工具。我們使用它在本機將實際的 React Native 框架程式碼新增到您目前的專案中。
我們建議使用 Homebrew 安裝 CocoaPods
brew install cocoapods
4. 將 React Native 新增至您的應用程式
設定 CocoaPods
為了設定 CocoaPods,我們需要兩個檔案
- 一個 Gemfile,用於定義我們需要的 Ruby 依賴項。
- 一個 Podfile,用於定義如何正確安裝我們的依賴項。
對於 Gemfile,前往您的專案根目錄並執行此命令
curl -O https://raw.githubusercontent.com/react-native-community/template/refs/heads/0.78-stable/template/Gemfile
這將從範本下載 Gemfile。
如果您使用 Xcode 16 建立專案,您需要更新 Gemfile,如下所示
-gem 'cocoapods', '>= 1.13', '!= 1.15.0', '!= 1.15.1'
+gem 'cocoapods', '1.16.2'
gem 'activesupport', '>= 6.1.7.5', '!= 7.1.0'
-gem 'xcodeproj', '< 1.26.0'
+gem 'xcodeproj', '1.27.0'
Xcode 16 產生專案的方式與舊版 Xcode 略有不同,您需要最新的 CocoaPods 和 Xcodeproj gems 才能使其正常運作。
同樣地,對於 Podfile,前往您專案的 ios 資料夾並執行
curl -O https://raw.githubusercontent.com/react-native-community/template/refs/heads/0.78-stable/template/ios/Podfile
請使用社群範本作為 Gemfile 和 Podfile 的參考點。
現在,我們需要執行幾個額外的命令來安裝 Ruby gems 和 Pods。導航至 ios 資料夾並執行以下命令
bundle install
bundle exec pod install
第一個命令將安裝 Ruby 依賴項,第二個命令將實際將 React Native 程式碼整合到您的應用程式中,以便您的 iOS 檔案可以 import React Native headers。
5. 編寫 TypeScript 程式碼
現在我們將實際修改原生 iOS 應用程式以整合 React Native。
我們要編寫的第一段程式碼是實際的 React Native 程式碼,用於將整合到我們應用程式中的新畫面。
建立 index.js 檔案
首先,在您的 React Native 專案的根目錄中建立一個空的 index.js 檔案。
index.js 是 React Native 應用程式的起點,而且始終是必需的。它可以是一個小檔案,import 屬於您的 React Native 組件或應用程式的其他檔案,或者它可以包含所需的所有程式碼。
我們的 index.js 應如下所示(此處為 社群範本檔案作為參考)
import {AppRegistry} from 'react-native';
import App from './App';

AppRegistry.registerComponent('HelloWorld', () => App);
建立 App.tsx 檔案
讓我們建立一個 App.tsx 檔案。這是一個 TypeScript 檔案,可以具有 JSX 表達式。它包含我們將整合到我們的 iOS 應用程式中的根 React Native 組件(連結)
import React from 'react';
import {
  SafeAreaView,
  ScrollView,
  StatusBar,
  StyleSheet,
  Text,
  useColorScheme,
  View,
} from 'react-native';

import {
  Colors,
  DebugInstructions,
  Header,
  ReloadInstructions,
} from 'react-native/Libraries/NewAppScreen';

function App(): React.JSX.Element {
  const isDarkMode = useColorScheme() === 'dark';

  const backgroundStyle = {
    backgroundColor: isDarkMode ? Colors.darker : Colors.lighter,
  };

  return (
    <SafeAreaView style={backgroundStyle}>
      <StatusBar
        barStyle={isDarkMode ? 'light-content' : 'dark-content'}
        backgroundColor={backgroundStyle.backgroundColor}
      />
      <ScrollView
        contentInsetAdjustmentBehavior="automatic"
        style={backgroundStyle}>
        <Header />
        <View
          style={{
            backgroundColor: isDarkMode
              ? Colors.black
              : Colors.white,
            padding: 24,
          }}>
          <Text style={styles.title}>Step One</Text>
          <Text>
            Edit <Text style={styles.bold}>App.tsx</Text> to
            change this screen and see your edits.
          </Text>
          <Text style={styles.title}>See your changes</Text>
          <ReloadInstructions />
          <Text style={styles.title}>Debug</Text>
          <DebugInstructions />
        </View>
      </ScrollView>
    </SafeAreaView>
  );
}

const styles = StyleSheet.create({
  title: {
    fontSize: 24,
    fontWeight: '600',
  },
  bold: {
    fontWeight: '700',
  },
});

export default App;
此處為 社群範本檔案作為參考
5. 與您的 iOS 程式碼整合
我們現在需要新增一些原生程式碼,以便啟動 React Native 執行時並告知它呈現我們的 React 組件。
需求
React Native 初始化現在與 iOS 應用程式的任何特定部分無關。
可以使用名為 RCTReactNativeFactory 的類別初始化 React Native,該類別負責為您處理 React Native 生命周期。
一旦類別初始化完成,您可以透過提供 UIWindow 物件來啟動 React Native 視圖,或者您可以要求工廠產生一個 UIView,您可以將其載入任何 UIViewController 中。
在以下範例中,我們將建立一個 ViewController,它可以載入 React Native 視圖作為其 view。
建立 ReactViewController
從範本 (⌘+N) 建立一個新檔案,並選擇 Cocoa Touch Class 範本。
確保選擇 UIViewController 作為「Subclass of」欄位。
- ObjectiveC
- Swift
現在開啟 ReactViewController.m 檔案並套用以下變更
#import "ReactViewController.h"
+#import <React/RCTBundleURLProvider.h>
+#import <RCTReactNativeFactory.h>
+#import <RCTDefaultReactNativeFactoryDelegate.h>

@interface ReactViewController ()

@end

+@interface ReactNativeFactoryDelegate: RCTDefaultReactNativeFactoryDelegate
+@end

-@implementation ReactViewController
+@implementation ReactViewController {
+  RCTReactNativeFactory *_factory;
+  id<RCTReactNativeFactoryDelegate> _factoryDelegate;
+}

 - (void)viewDidLoad {
     [super viewDidLoad];
     // Do any additional setup after loading the view.
+    _factoryDelegate = [ReactNativeDelegate new];
+    _factory = [[RCTReactNativeFactory alloc] initWithDelegate:_factoryDelegate];
+    self.view = [_factory.rootViewFactory viewWithModuleName:@"HelloWorld"];
 }

@end

+@implementation ReactNativeFactoryDelegate
+
+- (NSURL *)sourceURLForBridge:(RCTBridge *)bridge
+{
+  return [self bundleURL];
+}
+
+- (NSURL *)bundleURL
+{
+#if DEBUG
+  return [RCTBundleURLProvider.sharedSettings jsBundleURLForBundleRoot:@"index"];
+#else
+  return [NSBundle.mainBundle URLForResource:@"main" withExtension:@"jsbundle"];
+#endif
+}

@end
現在開啟 ReactViewController.swift 檔案並套用以下變更
import UIKit
+import React
+import React_RCTAppDelegate

class ReactViewController: UIViewController {
+  var reactNativeFactory: RCTReactNativeFactory?
+  var reactNativeFactoryDelegate: RCTReactNativeFactoryDelegate?

  override func viewDidLoad() {
    super.viewDidLoad()
+    reactNativeFactoryDelegate = ReactNativeDelegate()
+    reactNativeFactory = RCTReactNativeFactory(delegate: reactNativeFactoryDelegate!)
+    view = reactNativeFactory!.rootViewFactory.view(withModuleName: "HelloWorld")

  }
}

+class ReactNativeDelegate: RCTDefaultReactNativeFactoryDelegate {
+    override func sourceURL(for bridge: RCTBridge) -> URL? {
+      self.bundleURL()
+    }
+
+    override func bundleURL() -> URL? {
+      #if DEBUG
+      RCTBundleURLProvider.sharedSettings().jsBundleURL(forBundleRoot: "index")
+      #else
+      Bundle.main.url(forResource: "main", withExtension: "jsbundle")
+      #endif
+    }
+
+}
在 rootViewController 中呈現 React Native 視圖
最後,我們可以呈現我們的 React Native 視圖。為此,我們需要一個新的 View Controller,它可以託管一個視圖,我們可以在其中載入 JS 內容。我們已經有了初始的 ViewController,我們可以使其呈現 ReactViewController。有多種方法可以做到這一點,具體取決於您的應用程式。對於此範例,我們假設您有一個按鈕可以模態呈現 React Native。
- ObjectiveC
- Swift
#import "ViewController.h"
+#import "ReactViewController.h"

@interface ViewController ()

@end

- @implementation ViewController
+@implementation ViewController {
+  ReactViewController *reactViewController;
+}

 - (void)viewDidLoad {
   [super viewDidLoad];
   // Do any additional setup after loading the view.
   self.view.backgroundColor = UIColor.systemBackgroundColor;
+  UIButton *button = [UIButton new];
+  [button setTitle:@"Open React Native" forState:UIControlStateNormal];
+  [button setTitleColor:UIColor.systemBlueColor forState:UIControlStateNormal];
+  [button setTitleColor:UIColor.blueColor forState:UIControlStateHighlighted];
+  [button addTarget:self action:@selector(presentReactNative) forControlEvents:UIControlEventTouchUpInside];
+  [self.view addSubview:button];

+  button.translatesAutoresizingMaskIntoConstraints = NO;
+  [NSLayoutConstraint activateConstraints:@[
+    [button.leadingAnchor constraintEqualToAnchor:self.view.leadingAnchor],
+    [button.trailingAnchor constraintEqualToAnchor:self.view.trailingAnchor],
+    [button.centerYAnchor constraintEqualToAnchor:self.view.centerYAnchor],
+    [button.centerXAnchor constraintEqualToAnchor:self.view.centerXAnchor],
+  ]];
 }

+- (void)presentReactNative
+{
+  if (reactViewController == NULL) {
+    reactViewController = [ReactViewController new];
+  }
+  [self presentViewController:reactViewController animated:YES];
+}

@end
import UIKit

class ViewController: UIViewController {

+  var reactViewController: ReactViewController?

  override func viewDidLoad() {
    super.viewDidLoad()
    // Do any additional setup after loading the view.
    self.view.backgroundColor = .systemBackground

+    let button = UIButton()
+    button.setTitle("Open React Native", for: .normal)
+    button.setTitleColor(.systemBlue, for: .normal)
+    button.setTitleColor(.blue, for: .highlighted)
+    button.addAction(UIAction { [weak self] _ in
+      guard let self else { return }
+      if reactViewController == nil {
+       reactViewController = ReactViewController()
+      }
+      present(reactViewController!, animated: true)
+    }, for: .touchUpInside)
+    self.view.addSubview(button)
+
+    button.translatesAutoresizingMaskIntoConstraints = false
+    NSLayoutConstraint.activate([
+      button.leadingAnchor.constraint(equalTo: self.view.leadingAnchor),
+      button.trailingAnchor.constraint(equalTo: self.view.trailingAnchor),
+      button.centerXAnchor.constraint(equalTo: self.view.centerXAnchor),
+      button.centerYAnchor.constraint(equalTo: self.view.centerYAnchor),
+    ])
  }
}
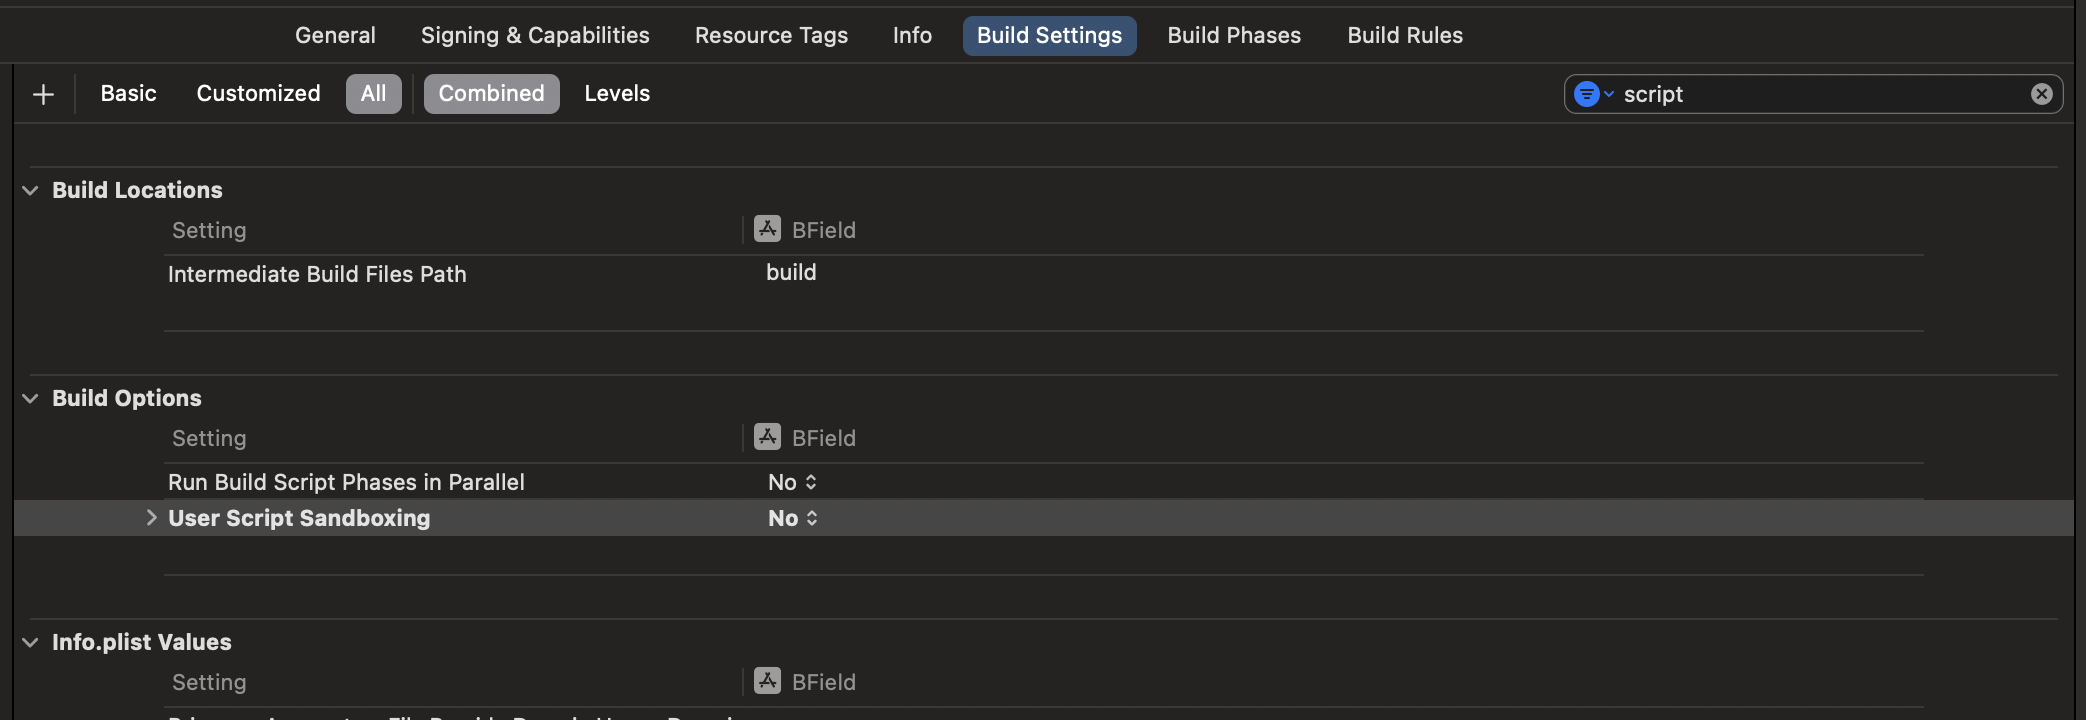
請確保停用 Sandbox scripting。為了實現此目的,在 Xcode 中,按一下您的應用程式,然後按一下建置設定。篩選 script 並將 User Script Sandboxing 設定為 NO。此步驟是正確切換我們隨 React Native 提供的 Hermes 引擎 的 Debug 和 Release 版本所必需的。
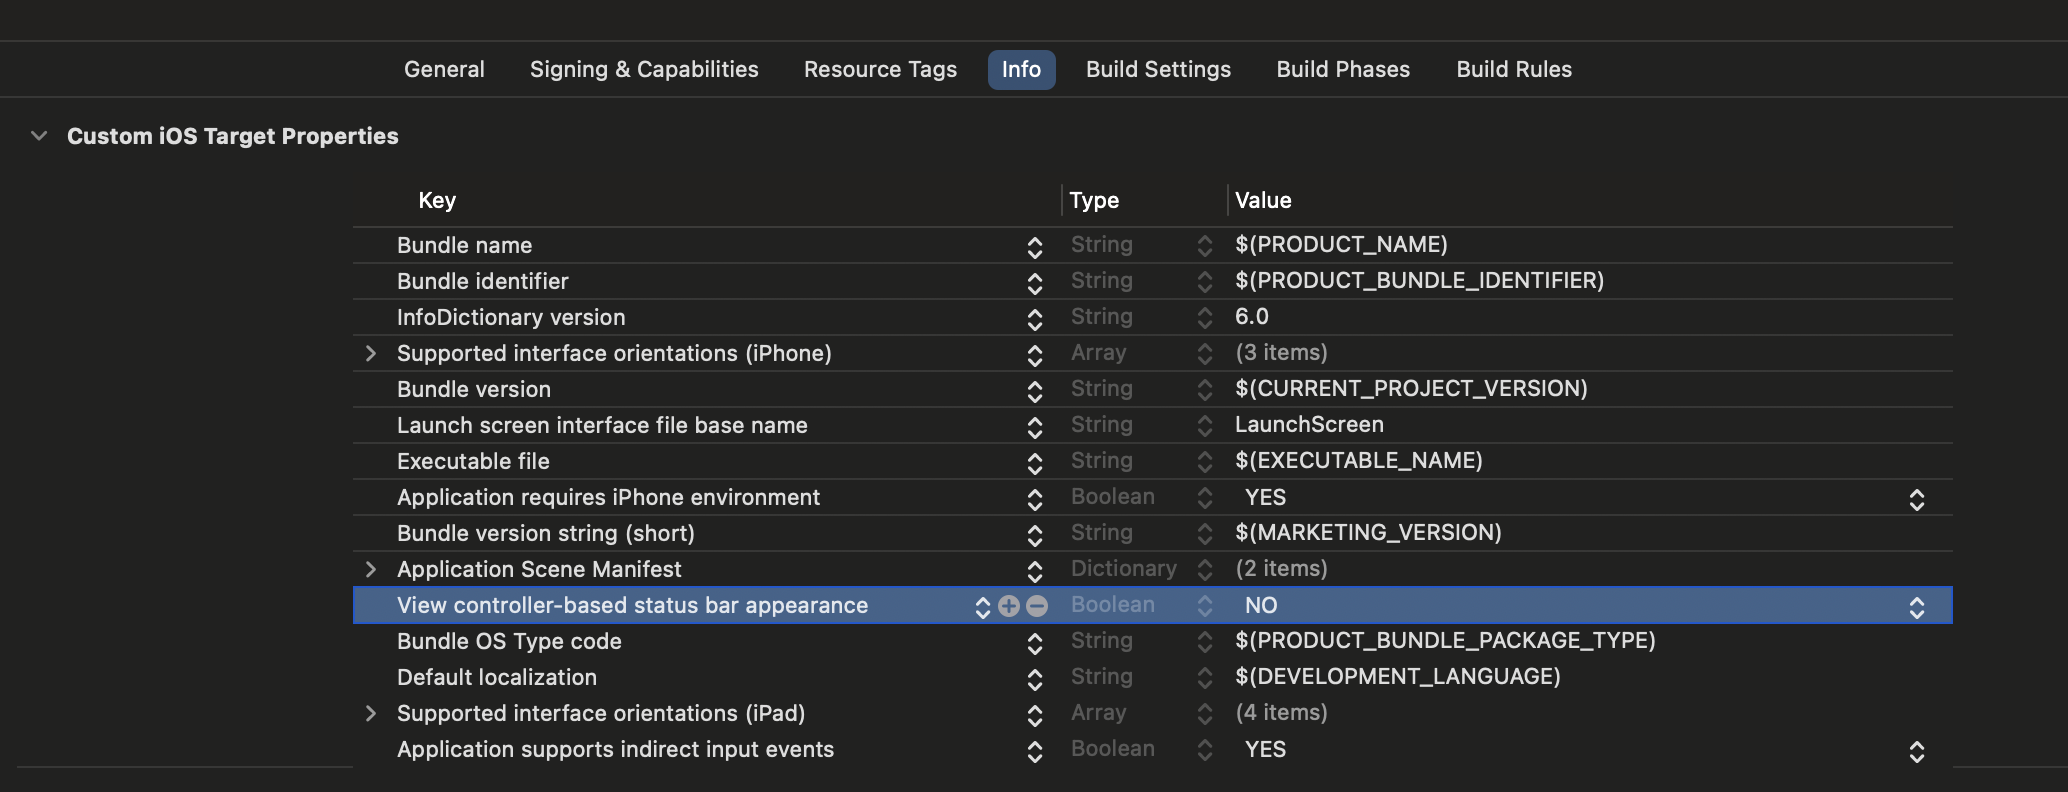
最後,請確保將 UIViewControllerBasedStatusBarAppearance 鍵新增至您的 Info.plist 檔案中,值為 NO。
6. 測試您的整合
您已完成將 React Native 與您的應用程式整合的所有基本步驟。現在我們將啟動 Metro bundler,將您的 TypeScript 應用程式程式碼建置到一個 bundle 中。Metro 的 HTTP 伺服器從您的開發環境上的 localhost 將 bundle 共用至模擬器或裝置。這允許 熱重載。
首先,您需要在您的專案根目錄中建立一個 metro.config.js 檔案,如下所示
const {getDefaultConfig} = require('@react-native/metro-config');
module.exports = getDefaultConfig(__dirname);
您可以查看社群範本檔案中的 metro.config.js 檔案 作為參考。
然後,您需要在您的專案根目錄中建立一個 .watchmanconfig 檔案。該檔案必須包含一個空的 json 物件
echo {} > .watchmanconfig
一旦您有了設定檔,您就可以執行 bundler。在您的專案根目錄中執行以下命令
- npm
- Yarn
npm start
yarn start
現在像平常一樣建置並執行您的 iOS 應用程式。
一旦您在應用程式內到達 React 驅動的 Activity,它應該從開發伺服器載入 JavaScript 程式碼並顯示

在 Xcode 中建立發行版本
您也可以使用 Xcode 來建立您的發行版本!唯一的額外步驟是新增一個在應用程式建置時執行的腳本,以將您的 JS 和圖片封裝到 iOS 應用程式中。
- 在 Xcode 中,選擇您的應用程式
- 按一下
Build Phases - 按一下左上角的
+,然後選擇New Run Script Phase - 按一下
Run Script行,然後將 Script 重新命名為Bundle React Native code and images - 將以下腳本貼到文字方塊中
set -e

WITH_ENVIRONMENT="$REACT_NATIVE_PATH/scripts/xcode/with-environment.sh"
REACT_NATIVE_XCODE="$REACT_NATIVE_PATH/scripts/react-native-xcode.sh"

/bin/sh -c "$WITH_ENVIRONMENT $REACT_NATIVE_XCODE"
- 將腳本拖放至名為
[CP] Embed Pods Frameworks的腳本之前。
現在,如果您為 Release 建置您的應用程式,它將如預期般運作。
接下來呢?
此時,您可以像平常一樣繼續開發您的應用程式。請參閱我們的偵錯和部署文件,以了解更多關於使用 React Native 的資訊。